%20--%3e%3cdefs%3e%3cstyle%3e%20.st0%20{%20fill:%20%23061b40;%20}%20.st1%20{%20fill:%20%23306af1;%20}%20.st2%20{%20fill:%20%235ce5cf;%20}%20%3c/style%3e%3c/defs%3e%3cg%3e%3cpath%20class='st0'%20d='M55,10.5h9v3h-9v9h12V7.5h-12v3ZM64,19.5h-6v-3h6v3Z'/%3e%3cpolygon%20class='st0'%20points='69%2016.5%2078%2016.5%2078%2019.5%2069%2019.5%2069%2022.5%2081%2022.5%2081%2013.5%2072%2013.5%2072%2010.5%2081%2010.5%2081%207.5%2069%207.5%2069%2016.5'/%3e%3cpolygon%20class='st0'%20points='95%2010.5%2095%207.5%2083%207.5%2083%2022.5%2095%2022.5%2095%2019.5%2086%2019.5%2086%2016.5%2095%2016.5%2095%2013.5%2086%2013.5%2086%2010.5%2095%2010.5'/%3e%3cpath%20class='st0'%20d='M40,1.5v21h11.6l1.4-1.4v-7.6h0c0,0-1.4-1.5-1.4-1.5l1.4-1.4V2.9l-1.4-1.4h-11.6ZM50,19.5h-7v-6h7v6ZM50,10.5h-7v-6h7v6Z'/%3e%3c/g%3e%3cpath%20class='st1'%20d='M23.1,24L14.7,4.8l-4.9,11.2h3.8l-1.8,4H3.3L12.1,0H2C.9,0,0,.9,0,2v20c0,1.1.9,2,2,2h21.1Z'/%3e%3cpath%20class='st2'%20d='M34,0h-16.8l10.6,24h6.2c1.1,0,2-.9,2-2V2C36,.9,35.1,0,34,0ZM32.5,20h-4V4h4v16Z'/%3e%3c/svg%3e)
モデル概要
モデル特徴
モデル能力
使用事例
🚀 Whisper-Large-V3-French-Distil-Dec16
Whisper-Large-V3-French-Distilは、Whisper-Large-V3-French の蒸留バージョンシリーズです。これは、デコーダー層の数を32から16、8、4、または2に減らし、大規模データセットを使って蒸留することで実現されています。詳細はこの 論文 で説明されています。
蒸留されたバリアントは、メモリ使用量と推論時間を削減しながら、性能(保持された層の数に基づく)を維持し、特に長文の文字起こしにおける幻覚のリスクを軽減します。さらに、これらは元のWhisper-Large-V3-Frenchモデルと組み合わせて推測的デコードを行うことができ、単独のモデルを使用する場合と比較して、推論速度の向上と一貫した出力を実現します。
このモデルは、transformers、openai-whisper、fasterwhisper、whisper.cpp、candle、mlxなど、さまざまなライブラリでの使用を容易にするため、さまざまな形式に変換されています。
📦 目次
✨ 性能
私たちは、短い文字起こしと長い文字起こしの両方でモデルを評価し、分布内と分布外の両方のデータセットでテストを行い、精度、汎化性、およびロバスト性を包括的に分析しました。
報告されているWERは、数字をテキストに変換し、句読点(アポストロフィとハイフンを除く)を削除し、すべての文字を小文字に変換した後の結果であることに注意してください。
公開データセットでのすべての評価結果は こちら で確認できます。
短い文字起こし
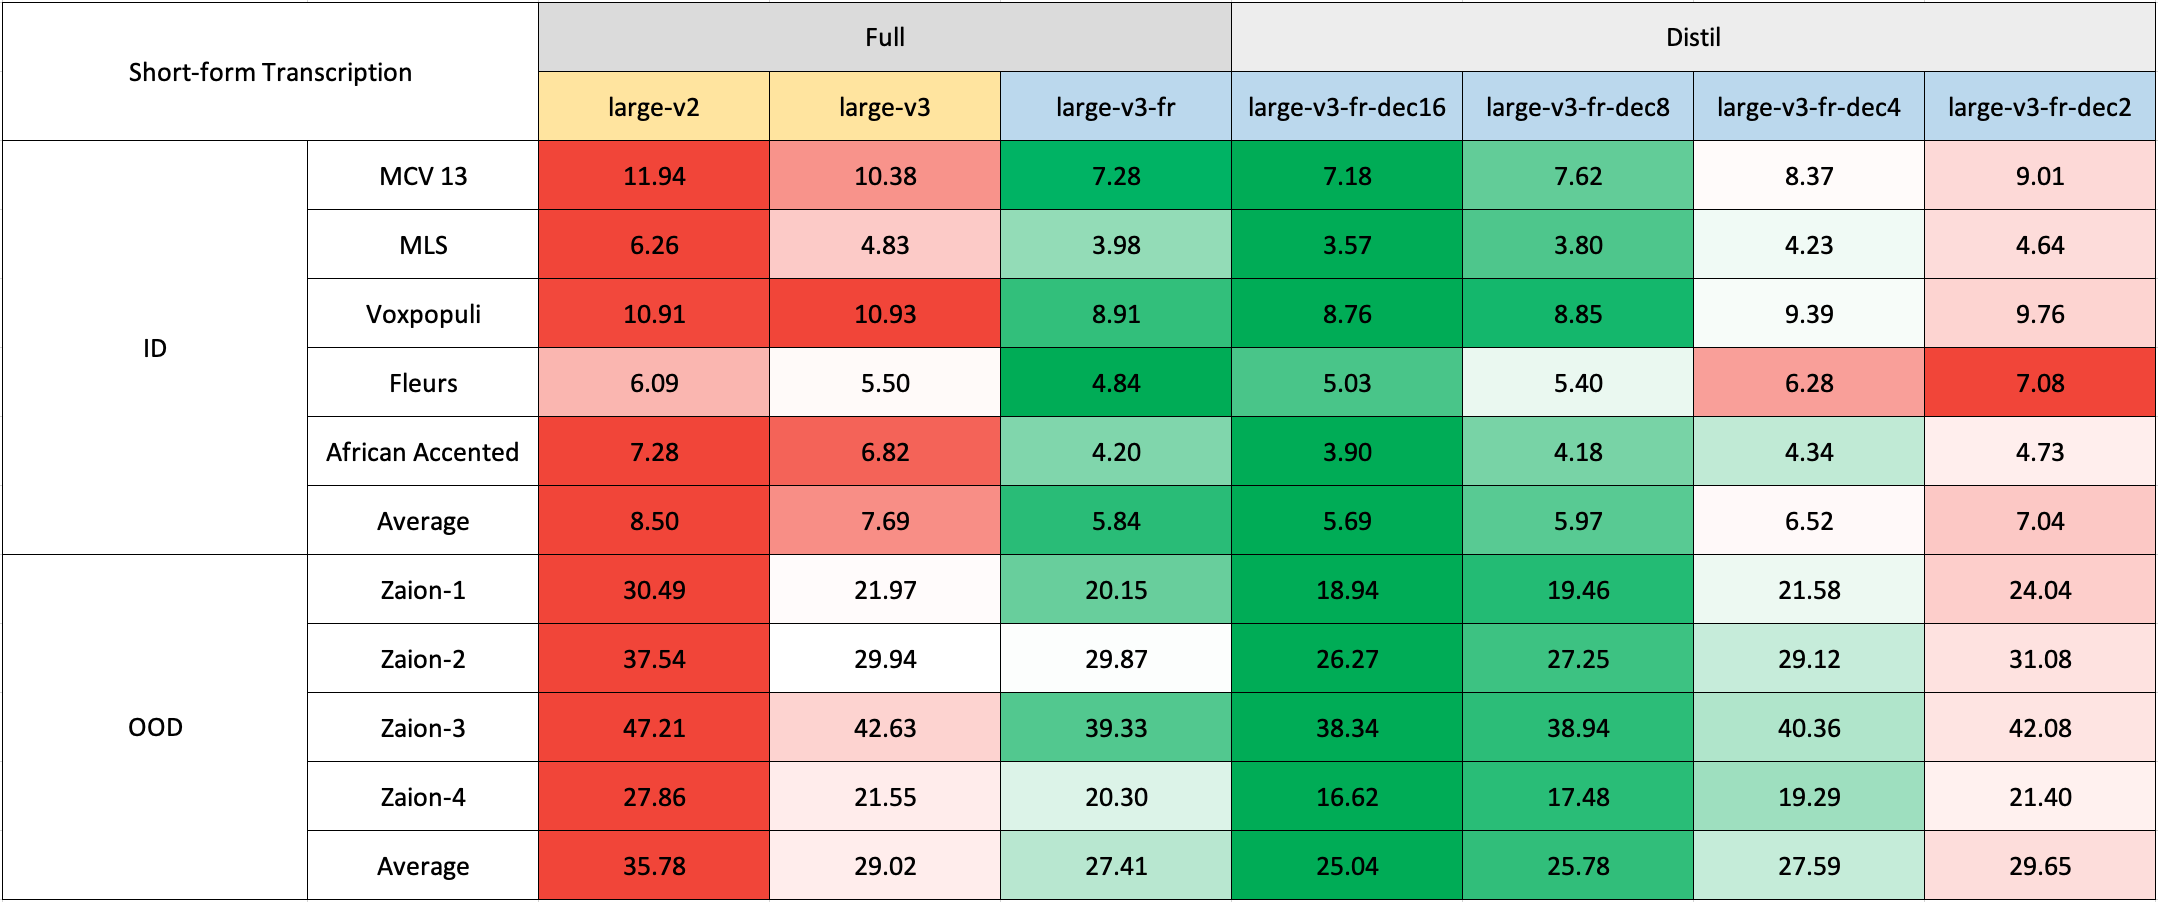
フランス語ですぐに利用できるドメイン外(OOD)および長文のテストセットが不足しているため、私たちは Zaion Lab の内部テストセットを使用して評価を行いました。これらのセットは、コールセンターの会話からの人間によるアノテーション付きの音声と文字起こしのペアで構成されており、著しい背景雑音とドメイン固有の用語が特徴です。
長い文字起こし
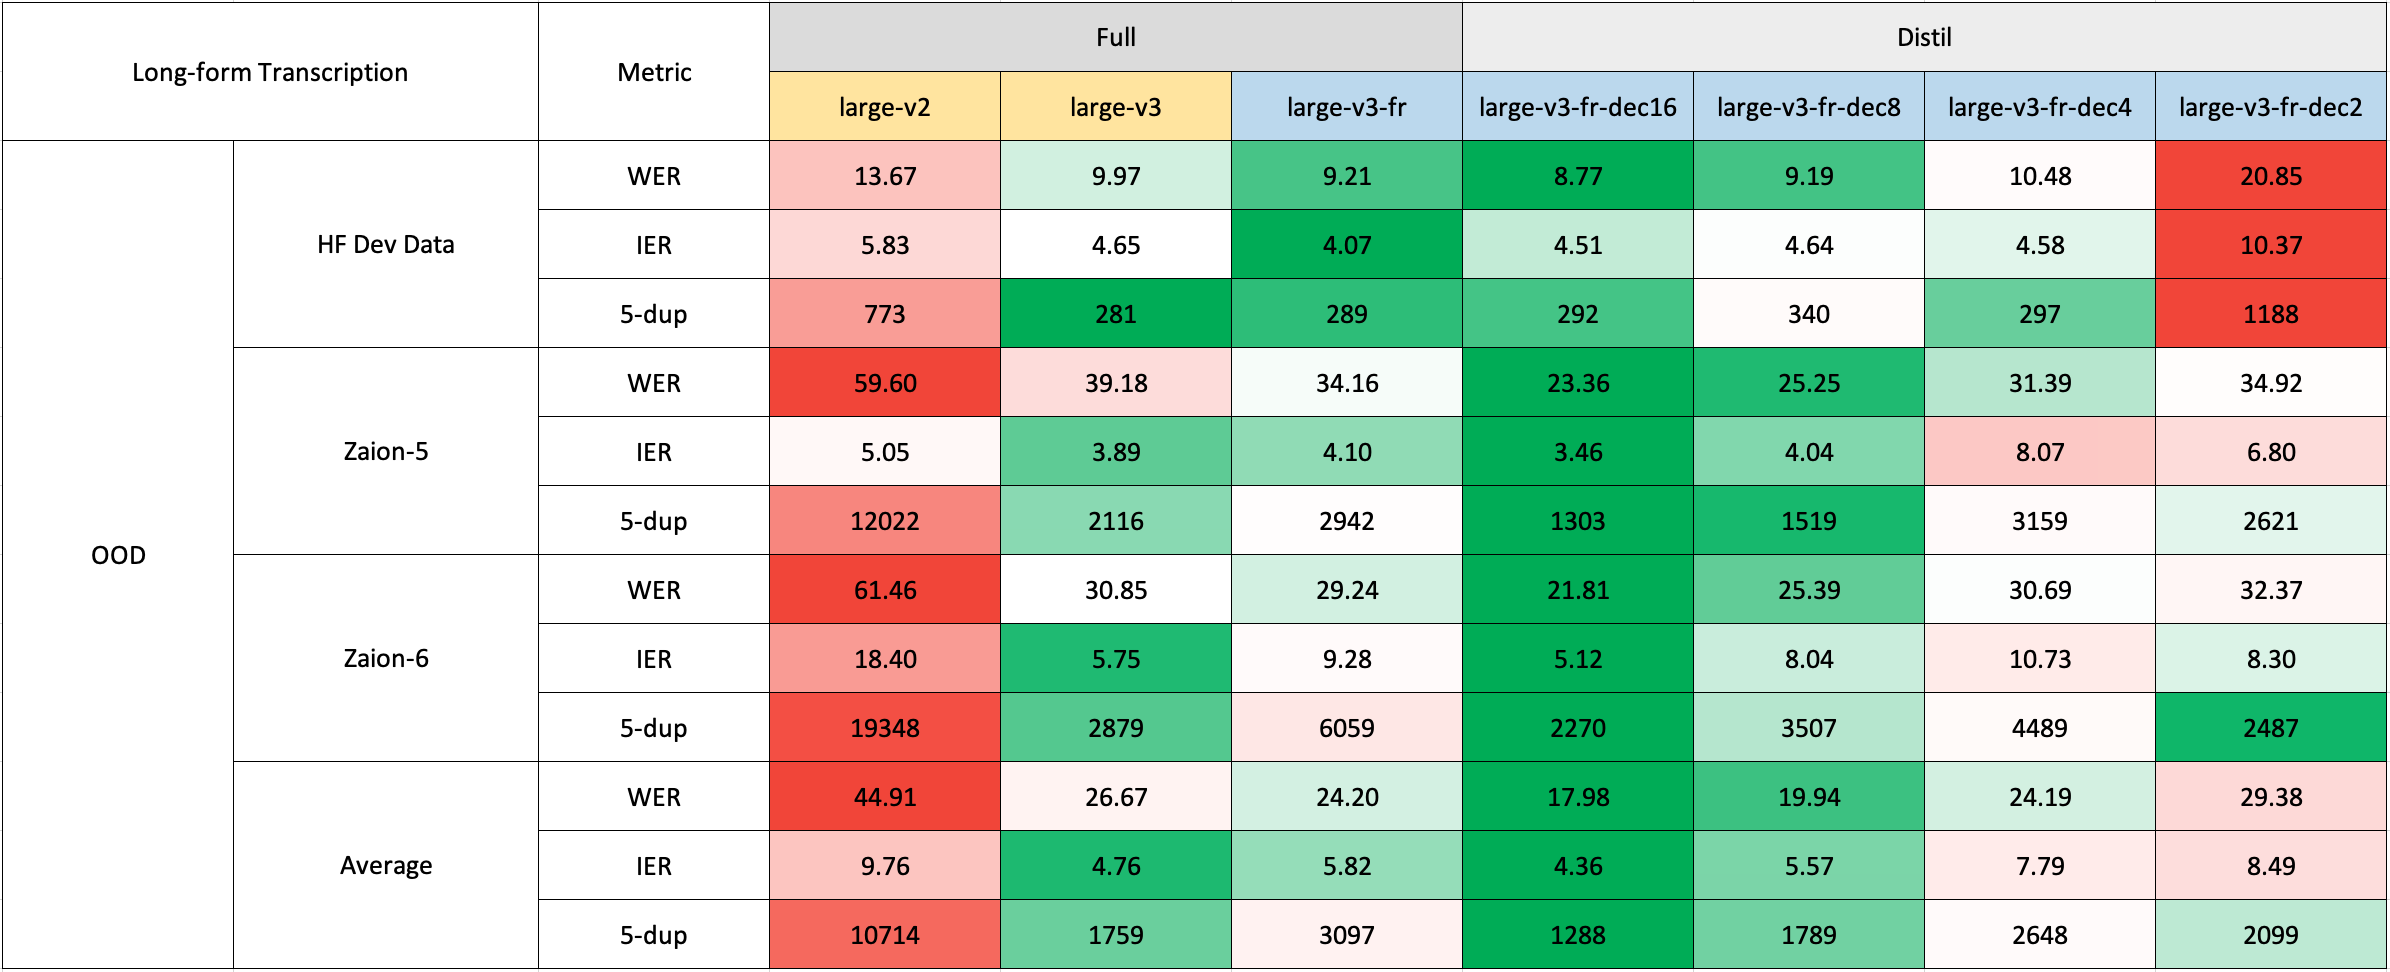
長い文字起こしは、より迅速な評価のために🤗 Hugging Faceパイプラインを使用して実行されました。音声ファイルは30秒のチャンクに分割され、並列に処理されました。
💻 使用方法
Hugging Faceパイプライン
このモデルは、🤗 Hugging Faceの pipeline クラスを使用して、音声の文字起こしに簡単に利用できます。
長文の文字起こし(30秒を超える)の場合は、chunk_length_s 引数を渡すことで処理をアクティブにできます。このアプローチでは、音声を小さなセグメントに分割し、並列に処理し、最長共通シーケンスを見つけることでストライドで結合します。このチャンク化された長文アプローチは、OpenAIの逐次アルゴリズムと比較してわずかに性能が低下する可能性がありますが、9倍速の推論速度を提供します。
import torch
from datasets import load_dataset
from transformers import AutoModelForSpeechSeq2Seq, AutoProcessor, pipeline

device = "cuda:0" if torch.cuda.is_available() else "cpu"
torch_dtype = torch.float16 if torch.cuda.is_available() else torch.float32

# Load model
model_name_or_path = "bofenghuang/whisper-large-v3-french-distil-dec16"
processor = AutoProcessor.from_pretrained(model_name_or_path)
model = AutoModelForSpeechSeq2Seq.from_pretrained(
    model_name_or_path,
    torch_dtype=torch_dtype,
    low_cpu_mem_usage=True,
)
model.to(device)

# Init pipeline
pipe = pipeline(
    "automatic-speech-recognition",
    model=model,
    feature_extractor=processor.feature_extractor,
    tokenizer=processor.tokenizer,
    torch_dtype=torch_dtype,
    device=device,
    # chunk_length_s=30,  # for long-form transcription
    max_new_tokens=128,
)

# Example audio
dataset = load_dataset("bofenghuang/asr-dummy", "fr", split="test")
sample = dataset[0]["audio"]

# Run pipeline
result = pipe(sample)
print(result["text"])
Hugging Face低レベルAPI
🤗 Hugging Faceの低レベルAPIを使用して文字起こしを行うこともできます。これにより、プロセスをより細かく制御できます。以下に例を示します。
import torch
from datasets import load_dataset
from transformers import AutoModelForSpeechSeq2Seq, AutoProcessor

device = "cuda:0" if torch.cuda.is_available() else "cpu"
torch_dtype = torch.float16 if torch.cuda.is_available() else torch.float32

# Load model
model_name_or_path = "bofenghuang/whisper-large-v3-french-distil-dec16"
processor = AutoProcessor.from_pretrained(model_name_or_path)
model = AutoModelForSpeechSeq2Seq.from_pretrained(
    model_name_or_path,
    torch_dtype=torch_dtype,
    low_cpu_mem_usage=True,
)
model.to(device)

# Example audio
dataset = load_dataset("bofenghuang/asr-dummy", "fr", split="test")
sample = dataset[0]["audio"]

# Extract feautres
input_features = processor(
    sample["array"], sampling_rate=sample["sampling_rate"], return_tensors="pt"
).input_features


# Generate tokens
predicted_ids = model.generate(
    input_features.to(dtype=torch_dtype).to(device), max_new_tokens=128
)

# Detokenize to text
transcription = processor.batch_decode(predicted_ids, skip_special_tokens=True)[0]
print(transcription)
推測的デコード
推測的デコード は、ドラフトモデル(本質的にはWhisperの蒸留バージョン)を使用して実現できます。このアプローチは、メインのWhisperモデルのみを使用する場合と同じ出力を保証し、2倍速の推論速度を提供し、メモリオーバーヘッドのわずかな増加のみを伴います。
蒸留されたWhisperは元のエンコーダーと同じであるため、推論時にはデコーダーのみをロードする必要があり、エンコーダーの出力はメインモデルとドラフトモデル間で共有されます。
Hugging Faceパイプラインで推測的デコードを使用するのは簡単です。生成設定内で assistant_model を指定するだけです。
import torch
from datasets import load_dataset
from transformers import (
    AutoModelForCausalLM,
    AutoModelForSpeechSeq2Seq,
    AutoProcessor,
    pipeline,
)

device = "cuda:0" if torch.cuda.is_available() else "cpu"
torch_dtype = torch.float16 if torch.cuda.is_available() else torch.float32

# Load model
model_name_or_path = "bofenghuang/whisper-large-v3-french"
processor = AutoProcessor.from_pretrained(model_name_or_path)
model = AutoModelForSpeechSeq2Seq.from_pretrained(
    model_name_or_path,
    torch_dtype=torch_dtype,
    low_cpu_mem_usage=True,
)
model.to(device)

# Load draft model
assistant_model_name_or_path = "bofenghuang/whisper-large-v3-french-distil-dec2"
assistant_model = AutoModelForCausalLM.from_pretrained(
    assistant_model_name_or_path,
    torch_dtype=torch_dtype,
    low_cpu_mem_usage=True,
)
assistant_model.to(device)

# Init pipeline
pipe = pipeline(
    "automatic-speech-recognition",
    model=model,
    feature_extractor=processor.feature_extractor,
    tokenizer=processor.tokenizer,
    torch_dtype=torch_dtype,
    device=device,
    generate_kwargs={"assistant_model": assistant_model},
    max_new_tokens=128,
)

# Example audio
dataset = load_dataset("bofenghuang/asr-dummy", "fr", split="test")
sample = dataset[0]["audio"]

# Run pipeline
result = pipe(sample)
print(result["text"])
OpenAI Whisper
OpenAIが元の 論文 で説明した、スライディングウィンドウと温度フォールバックを使用した逐次的な長文デコードアルゴリズムを使用することもできます。
まず、openai-whisper パッケージをインストールします。
pip install -U openai-whisper
次に、変換されたモデルをダウンロードします。
python -c "from huggingface_hub import hf_hub_download; hf_hub_download(repo_id='bofenghuang/whisper-large-v3-french-distil-dec16', filename='original_model.pt', local_dir='./models/whisper-large-v3-french-distil-dec16')"
これで、リポジトリに記載されている使用方法に従って音声ファイルを文字起こしできます。
import whisper
from datasets import load_dataset

# Load model
model = whisper.load_model("./models/whisper-large-v3-french-distil-dec16/original_model.pt")

# Example audio
dataset = load_dataset("bofenghuang/asr-dummy", "fr", split="test")
sample = dataset[0]["audio"]["array"].astype("float32")

# Transcribe
result = model.transcribe(sample, language="fr")
print(result["text"])
Faster Whisper
Faster Whisperは、OpenAIのWhisperモデルと逐次的な長文デコードアルゴリズムを CTranslate2 形式で再実装したものです。
openai-whisperと比較して、最大4倍の推論速度を提供し、メモリ使用量が少なくなります。さらに、モデルをint8に量子化することができ、CPUとGPUの両方で効率が向上します。
まず、faster-whisper パッケージをインストールします。
pip install faster-whisper
次に、CTranslate2形式に変換されたモデルをダウンロードします。
python -c "from huggingface_hub import snapshot_download; snapshot_download(repo_id='bofenghuang/whisper-large-v3-french-distil-dec16', local_dir='./models/whisper-large-v3-french-distil-dec16', allow_patterns='ctranslate2/*')"
これで、リポジトリに記載されている使用方法に従って音声ファイルを文字起こしできます。
from datasets import load_dataset
from faster_whisper import WhisperModel

# Load model
model = WhisperModel("./models/whisper-large-v3-french-distil-dec16/ctranslate2", device="cuda", compute_type="float16")  # Run on GPU with FP16

# Example audio
dataset = load_dataset("bofenghuang/asr-dummy", "fr", split="test")
sample = dataset[0]["audio"]["array"].astype("float32")

segments, info = model.transcribe(sample, beam_size=5, language="fr")

for segment in segments:
    print("[%.2fs -> %.2fs] %s" % (segment.start, segment.end, segment.text))
Whisper.cpp
Whisper.cppは、OpenAIのWhisperモデルを、依存関係のない純粋なC/C++で再実装したものです。さまざまなバックエンドとプラットフォームと互換性があります。
さらに、モデルを4ビットまたは5ビットの整数に量子化することができ、効率が向上します。
まず、whisper.cpp リポジトリをクローンしてビルドします。
git clone https://github.com/ggerganov/whisper.cpp.git
cd whisper.cpp

# build the main example
make
次に、Hugging Face Hubから変換されたggmlウェイトをダウンロードします。
# Download model quantized with Q5_0 method
python -c "from huggingface_hub import hf_hub_download; hf_hub_download(repo_id='bofenghuang/whisper-large-v3-french-distil-dec16', filename='ggml-model-q5_0.bin', local_dir='./models/whisper-large-v3-french-distil-dec16')"
これで、次のコマンドを使用して音声ファイルを文字起こしできます。
./main -m ./models/whisper-large-v3-french-distil-dec16/ggml-model-q5_0.bin -l fr -f /path/to/audio/file --print-colors
Candle
Candle-whisper は、OpenAIのWhisperモデルをcandle形式(Rustで構築された軽量MLフレームワーク)で再実装したものです。
まず、candle リポジトリをクローンします。
git clone https://github.com/huggingface/candle.git
cd candle/candle-examples/examples/whisper
次のコマンドを使用して音声ファイルを文字起こしします。
cargo run --example whisper --release -- --model large-v3 --model-id bofenghuang/whisper-large-v3-french-distil-dec16 --language fr --input /path/to/audio/file
CUDAを使用する場合は、サンプルコマンドラインに --features cuda を追加します。
cargo run --example whisper --release --features cuda -- --model large-v3 --model-id bofenghuang/whisper-large-v3-french-distil-dec16 --language fr --input /path/to/audio/file
MLX
MLX-Whisper は、OpenAIのWhisperモデルを MLX 形式(Appleシリコン上のMLフレームワーク)で再実装したものです。これは、遅延評価や統一されたメモリ管理などの機能をサポートしています。
まず、MLX Examples リポジトリをクローンします。
git clone https://github.com/ml-explore/mlx-examples.git
cd mlx-examples/whisper
次に、依存関係をインストールします(残りの部分は原文が途中で途切れていますが、ここまで翻訳しました)。
🔧 学習の詳細
(原文に具体的な学習の詳細内容がないため、この部分は省略)
📄 謝辞
(原文に謝辞の具体的内容がないため、この部分は省略)
📄 ライセンス
このモデルはMITライセンスの下で提供されています。