%20--%3e%3cdefs%3e%3cstyle%3e%20.st0%20{%20fill:%20%23061b40;%20}%20.st1%20{%20fill:%20%23306af1;%20}%20.st2%20{%20fill:%20%235ce5cf;%20}%20%3c/style%3e%3c/defs%3e%3cg%3e%3cpath%20class='st0'%20d='M55,10.5h9v3h-9v9h12V7.5h-12v3ZM64,19.5h-6v-3h6v3Z'/%3e%3cpolygon%20class='st0'%20points='69%2016.5%2078%2016.5%2078%2019.5%2069%2019.5%2069%2022.5%2081%2022.5%2081%2013.5%2072%2013.5%2072%2010.5%2081%2010.5%2081%207.5%2069%207.5%2069%2016.5'/%3e%3cpolygon%20class='st0'%20points='95%2010.5%2095%207.5%2083%207.5%2083%2022.5%2095%2022.5%2095%2019.5%2086%2019.5%2086%2016.5%2095%2016.5%2095%2013.5%2086%2013.5%2086%2010.5%2095%2010.5'/%3e%3cpath%20class='st0'%20d='M40,1.5v21h11.6l1.4-1.4v-7.6h0c0,0-1.4-1.5-1.4-1.5l1.4-1.4V2.9l-1.4-1.4h-11.6ZM50,19.5h-7v-6h7v6ZM50,10.5h-7v-6h7v6Z'/%3e%3c/g%3e%3cpath%20class='st1'%20d='M23.1,24L14.7,4.8l-4.9,11.2h3.8l-1.8,4H3.3L12.1,0H2C.9,0,0,.9,0,2v20c0,1.1.9,2,2,2h21.1Z'/%3e%3cpath%20class='st2'%20d='M34,0h-16.8l10.6,24h6.2c1.1,0,2-.9,2-2V2C36,.9,35.1,0,34,0ZM32.5,20h-4V4h4v16Z'/%3e%3c/svg%3e)
模型简介
模型特点
模型能力
使用案例
🚀 Distil-Whisper: distil-medium.en
Distil-Whisper是一个用于英语自动语音识别的模型。它是Whisper模型的蒸馏版本,速度提升了6倍,模型大小减小了49%,并且在分布外评估集上的字错率(WER)与原模型相差在1%以内。
🚀 快速开始
Distil-Whisper从Hugging Face 🤗 Transformers的4.35版本开始得到支持。要运行该模型,首先需要安装最新版本的Transformers库。在这个示例中,我们还将安装🤗 Datasets,以便从Hugging Face Hub加载玩具音频数据集:
pip install --upgrade pip
pip install --upgrade transformers accelerate datasets[audio]
✨ 主要特性
- 速度快:相比原Whisper模型,速度提升了6倍。
- 模型小:模型大小减小了49%。
- 性能接近:在分布外评估集上的字错率(WER)与原模型相差在1%以内。
- 支持多种使用方式:支持短音频转录、长音频转录、推测解码等。
- 可进行额外优化:可以通过Flash Attention、Torch Scale-Product-Attention等方式进一步提升速度和内存使用效率。
💻 使用示例
基础用法
短音频转录
模型可以使用pipeline类对短音频文件(< 30秒)进行转录,示例代码如下:
import torch
from transformers import AutoModelForSpeechSeq2Seq, AutoProcessor, pipeline
from datasets import load_dataset


device = "cuda:0" if torch.cuda.is_available() else "cpu"
torch_dtype = torch.float16 if torch.cuda.is_available() else torch.float32

model_id = "distil-whisper/distil-medium.en"

model = AutoModelForSpeechSeq2Seq.from_pretrained(
    model_id, torch_dtype=torch_dtype, low_cpu_mem_usage=True, use_safetensors=True
)
model.to(device)

processor = AutoProcessor.from_pretrained(model_id)

pipe = pipeline(
    "automatic-speech-recognition",
    model=model,
    tokenizer=processor.tokenizer,
    feature_extractor=processor.feature_extractor,
    max_new_tokens=128,
    torch_dtype=torch_dtype,
    device=device,
)

dataset = load_dataset("hf-internal-testing/librispeech_asr_dummy", "clean", split="validation")
sample = dataset[0]["audio"]

result = pipe(sample)
print(result["text"])
要转录本地音频文件,只需在调用pipeline时传入音频文件的路径:
- result = pipe(sample)
+ result = pipe("audio.mp3")
长音频转录
Distil-Whisper使用分块算法对长音频文件(> 30秒)进行转录。实际上,这种分块长音频算法比OpenAI在Whisper论文中提出的顺序算法快9倍(见Distil-Whisper论文的表7)。
要启用分块功能,需要在pipeline中传入chunk_length_s参数。对于Distil-Whisper,15秒的分块长度是最优的。要启用批处理,需要传入batch_size参数:
import torch
from transformers import AutoModelForSpeechSeq2Seq, AutoProcessor, pipeline
from datasets import load_dataset


device = "cuda:0" if torch.cuda.is_available() else "cpu"
torch_dtype = torch.float16 if torch.cuda.is_available() else torch.float32

model_id = "distil-whisper/distil-medium.en"

model = AutoModelForSpeechSeq2Seq.from_pretrained(
    model_id, torch_dtype=torch_dtype, low_cpu_mem_usage=True, use_safetensors=True
)
model.to(device)

processor = AutoProcessor.from_pretrained(model_id)

pipe = pipeline(
    "automatic-speech-recognition",
    model=model,
    tokenizer=processor.tokenizer,
    feature_extractor=processor.feature_extractor,
    max_new_tokens=128,
    chunk_length_s=15,
    batch_size=16,
    torch_dtype=torch_dtype,
    device=device,
)

dataset = load_dataset("distil-whisper/librispeech_long", "default", split="validation")
sample = dataset[0]["audio"]

result = pipe(sample)
print(result["text"])
推测解码
Distil-Whisper可以作为Whisper的辅助模型用于推测解码。推测解码在数学上保证了与Whisper相同的输出,同时速度提高了2倍。这使得它成为现有Whisper管道的完美替代品,因为可以保证相同的输出。 在以下代码片段中,我们将辅助Distil-Whisper模型独立加载到主Whisper管道中。然后,我们将其指定为生成的“辅助模型”:
from transformers import pipeline, AutoModelForCausalLM, AutoModelForSpeechSeq2Seq, AutoProcessor
import torch
from datasets import load_dataset

device = "cuda:0" if torch.cuda.is_available() else "cpu"
torch_dtype = torch.float16 if torch.cuda.is_available() else torch.float32

assistant_model_id = "distil-whisper/distil-medium.en"

assistant_model = AutoModelForCausalLM.from_pretrained(
    assistant_model_id, torch_dtype=torch_dtype, low_cpu_mem_usage=True, use_safetensors=True
)
assistant_model.to(device)

model_id = "openai/whisper-medium.en"

model = AutoModelForSpeechSeq2Seq.from_pretrained(
    model_id, torch_dtype=torch_dtype, low_cpu_mem_usage=True, use_safetensors=True
)
model.to(device)

processor = AutoProcessor.from_pretrained(model_id)

pipe = pipeline(
    "automatic-speech-recognition",
    model=model,
    tokenizer=processor.tokenizer,
    feature_extractor=processor.feature_extractor,
    max_new_tokens=128,
    generate_kwargs={"assistant_model": assistant_model},
    torch_dtype=torch_dtype,
    device=device,
)

dataset = load_dataset("hf-internal-testing/librispeech_asr_dummy", "clean", split="validation")
sample = dataset[0]["audio"]

result = pipe(sample)
print(result["text"])
高级用法
额外的速度和内存优化
你可以对Distil-Whisper应用额外的速度和内存优化,具体如下:
Flash Attention
如果你的GPU支持,我们建议使用Flash-Attention 2。为此,你首先需要安装Flash Attention:
pip install flash-attn --no-build-isolation
然后,你只需要在from_pretrained中传入use_flash_attention_2=True:
- model = AutoModelForSpeechSeq2Seq.from_pretrained(model_id, torch_dtype=torch_dtype, low_cpu_mem_usage=True, use_safetensors=True)
+ model = AutoModelForSpeechSeq2Seq.from_pretrained(model_id, torch_dtype=torch_dtype, low_cpu_mem_usage=True, use_safetensors=True, use_flash_attention_2=True)
Torch Scale-Product-Attention (SDPA)
如果你的GPU不支持Flash Attention,我们建议使用BetterTransformers。为此,你首先需要安装optimum:
pip install --upgrade optimum
然后,在使用模型之前将其转换为“BetterTransformer”模型:
model = AutoModelForSpeechSeq2Seq.from_pretrained(model_id, torch_dtype=torch_dtype, low_cpu_mem_usage=True, use_safetensors=True)
+ model = model.to_bettertransformer()
在openai-whisper中运行Distil-Whisper
要以原始Whisper格式使用该模型,首先要确保你已经安装了openai-whisper包:
pip install --upgrade openai-whisper
以下代码片段展示了如何转录使用🤗 Datasets加载的LibriSpeech数据集中的样本文件:
import torch
from datasets import load_dataset
from huggingface_hub import hf_hub_download
from whisper import load_model, transcribe

medium_en = hf_hub_download(repo_id="distil-whisper/distil-medium.en", filename="original-model.bin")
model = load_model(medium_en)

dataset = load_dataset("hf-internal-testing/librispeech_asr_dummy", "clean", split="validation")
sample = dataset[0]["audio"]["array"]
sample = torch.from_numpy(sample).float()

pred_out = transcribe(model, audio=sample)
print(pred_out["text"])
要转录本地音频文件,只需将音频文件的路径作为audio参数传递给transcribe:
pred_out = transcribe(model, audio="audio.mp3")
Whisper.cpp
Distil-Whisper可以使用Whisper.cpp仓库中的原始顺序长音频转录算法运行。在Mac M1上的临时基准测试中,distil-medium.en比large-v2快4倍,同时在长音频上的字错率(WER)相差在1%以内。
开始使用的步骤如下:
- 克隆Whisper.cpp仓库:
git clone https://github.com/ggerganov/whisper.cpp.git
cd whisper.cpp
- 从Hugging Face Hub下载
distil-medium.en的ggml权重:
python -c "from huggingface_hub import hf_hub_download; hf_hub_download(repo_id='distil-whisper/distil-medium.en', filename='ggml-medium-32-2.en.bin', local_dir='./models')"
如果你没有安装huggingface_hub包,也可以使用wget下载权重:
wget https://huggingface.co/distil-whisper/distil-medium.en/resolve/main/ggml-medium-32-2.en.bin -P ./models
- 使用提供的示例音频运行推理:
make -j && ./main -m models/ggml-medium-32-2.en.bin -f samples/jfk.wav
Transformers.js
import { pipeline } from '@xenova/transformers';

let transcriber = await pipeline('automatic-speech-recognition', 'distil-whisper/distil-medium.en');

let url = 'https://huggingface.co/datasets/Xenova/transformers.js-docs/resolve/main/jfk.wav';
let output = await transcriber(url);
// { text: " And so my fellow Americans, ask not what your country can do for you. Ask what you can do for your country." }
更多信息请参阅文档。
Candle
通过与Hugging Face Candle 🕯️集成,Distil-Whisper现在可以在Rust库🦀中使用。 优点如下:
- 优化的CPU后端,支持x86的MKL和Mac的Accelerate。
- CUDA后端,可在GPU上高效运行,支持通过NCCL进行多GPU分发。
- WASM支持:可以在浏览器中运行Distil-Whisper。 开始使用的步骤如下:
- 按照这里的说明安装
candle-core。 - 本地克隆
candle仓库:
git clone https://github.com/huggingface/candle.git
- 进入Whisper的示例目录:
cd candle/candle-examples/examples/whisper
- 运行示例:
cargo run --example whisper --release -- --model distil-medium.en
- 要指定自己的音频文件,添加
--input标志:
cargo run --example whisper --release -- --model distil-medium.en --input audio.wav
🔧 技术细节
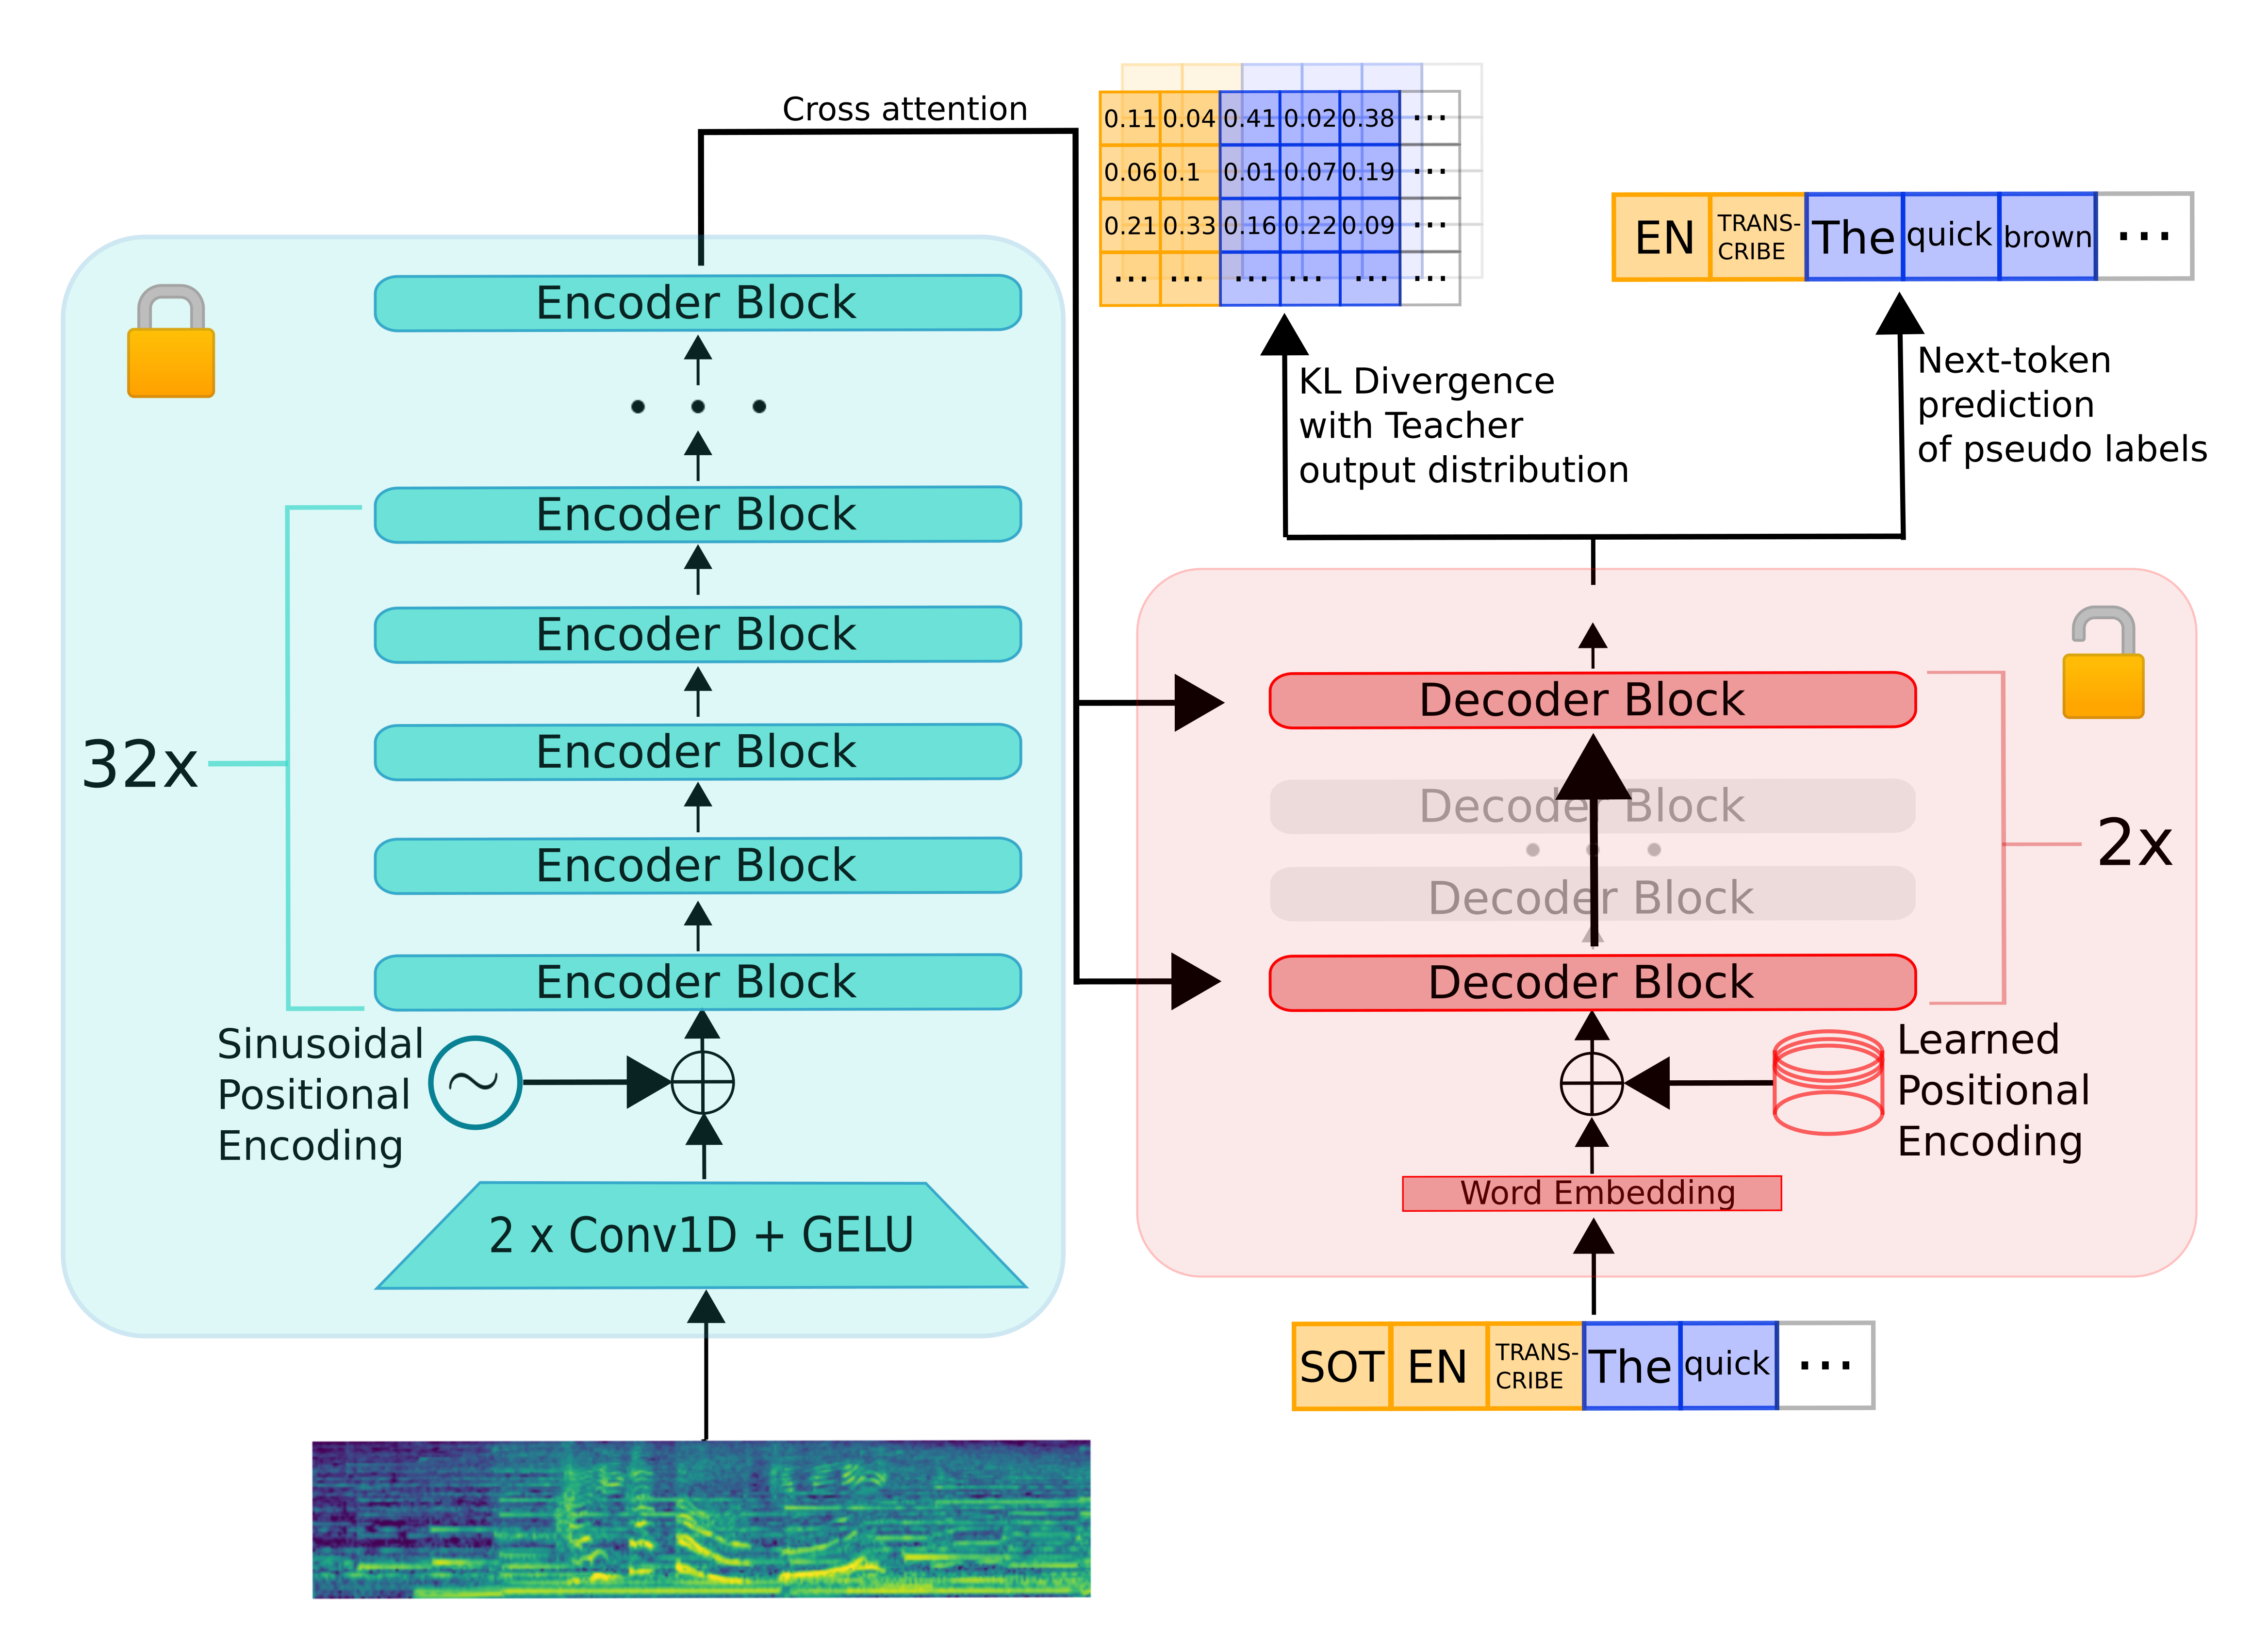
Distil-Whisper继承了Whisper的编码器 - 解码器架构。编码器将语音向量输入序列映射到隐藏状态向量序列。解码器根据所有先前的标记和编码器隐藏状态自回归地预测文本标记。因此,编码器只向前运行一次,而解码器运行的次数与生成的标记数量相同。实际上,这意味着解码器占总推理时间的90%以上。因此,为了优化延迟,应该重点关注最小化解码器的推理时间。 为了蒸馏Whisper模型,我们在保持编码器固定的同时减少了解码器层的数量。编码器(绿色部分)完全从教师模型复制到学生模型,并在训练期间冻结。学生模型的解码器仅由两个解码器层组成,这些层从教师模型的第一个和最后一个解码器层初始化(红色部分)。教师模型的所有其他解码器层都被丢弃。然后,模型在KL散度和伪标签损失项的加权和上进行训练。
📚 详细文档
评估
以下代码片段展示了如何在LibriSpeech验证集的clean子集上使用流式模式评估Distil-Whisper模型,这意味着不需要将音频数据下载到本地设备。
首先,我们需要安装所需的包,包括🤗 Datasets用于流式加载音频数据,以及🤗 Evaluate用于进行WER计算:
pip install --upgrade pip
pip install --upgrade transformers datasets[audio] evaluate jiwer
然后可以使用以下示例端到端地运行评估:
from transformers import AutoModelForSpeechSeq2Seq, AutoProcessor
from transformers.models.whisper.english_normalizer import EnglishTextNormalizer
from datasets import load_dataset
from evaluate import load
import torch
from tqdm import tqdm

# define our torch configuration
device = "cuda:0" if torch.cuda.is_available() else "cpu"
torch_dtype = torch.float16 if torch.cuda.is_available() else torch.float32

model_id = "distil-whisper/distil-medium.en"

# load the model + processor
model =  AutoModelForSpeechSeq2Seq.from_pretrained(model_id, torch_dtype=torch_dtype, use_safetensors=True, low_cpu_mem_usage=True)
model = model.to(device)
processor = AutoProcessor.from_pretrained(model_id)

# load the dataset with streaming mode
dataset = load_dataset("librispeech_asr", "clean", split="validation", streaming=True)

# define the evaluation metric
wer_metric = load("wer")
normalizer = EnglishTextNormalizer(processor.tokenizer.english_spelling_normalizer)

def inference(batch):
    # 1. Pre-process the audio data to log-mel spectrogram inputs
    audio = [sample["array"] for sample in batch["audio"]]
    input_features = processor(audio, sampling_rate=batch["audio"][0]["sampling_rate"], return_tensors="pt").input_features
    input_features = input_features.to(device, dtype=torch_dtype)

    # 2. Auto-regressively generate the predicted token ids
    pred_ids = model.generate(input_features, max_new_tokens=128)

    # 3. Decode the token ids to the final transcription
    batch["transcription"] = processor.batch_decode(pred_ids, skip_special_tokens=True)
    batch["reference"] = batch["text"]
    return batch

dataset = dataset.map(function=inference, batched=True, batch_size=16)

all_transcriptions = []
all_references = []

# iterate over the dataset and run inference
for i, result in tqdm(enumerate(dataset), desc="Evaluating..."):
    all_transcriptions.append(result["transcription"])
    all_references.append(result["reference"])

# normalize predictions and references
all_transcriptions = [normalizer(transcription) for transcription in all_transcriptions]
all_references = [normalizer(reference) for reference in all_references]

# compute the WER metric
wer = 100 * wer_metric.compute(predictions=all_transcriptions, references=all_references)
print(wer)
打印输出:
3.593196832001168
预期用途
Distil-Whisper旨在作为Whisper在英语语音识别中的直接替代品。特别是,它在分布外测试数据上实现了相当的WER结果,同时在短音频和长音频上都快6倍。
数据
Distil-Whisper在Hugging Face Hub上的9个开源、许可宽松的语音数据集的22,000小时音频数据上进行训练:
| 属性 | 详情 |
|---|---|
| 模型类型 | Distil-Whisper是Whisper模型的蒸馏版本,继承了编码器 - 解码器架构。 |
| 训练数据 | 训练数据来自9个开源、许可宽松的语音数据集,包括People's Speech、Common Voice 13、GigaSpeech等,总时长约21,770小时,涵盖10个不同领域和超过50k个说话者。 |
WER过滤
Whisper的伪标签预测可能存在误转录和幻觉问题。为了确保我们只在准确的伪标签上进行训练,我们在训练期间采用了简单的WER启发式方法。首先,我们对Whisper的伪标签和每个数据集提供的真实标签进行归一化。然后,我们计算这些标签之间的WER。如果WER超过指定的阈值,我们将丢弃该训练示例。否则,我们将其保留用于训练。 Distil-Whisper论文的第9.2节展示了该过滤器对提高蒸馏模型下游性能的有效性。我们还部分将Distil-Whisper对幻觉的鲁棒性归因于该过滤器。
训练
模型进行了80,000次优化步骤(即8个epoch)的训练。Tensorboard训练日志可以在以下链接找到:https://huggingface.co/distil-whisper/distil-medium.en/tensorboard?params=scalars#frame
结果
蒸馏后的模型在分布外(OOD)短音频上的WER与Whisper相差在1%以内,在OOD长音频上比Whisper高0.1%。这种性能提升归因于较低的幻觉。 有关每个数据集评估结果的详细细分,请参阅Distil-Whisper论文的表16和表17。 Distil-Whisper还在ESB基准数据集上进行了评估,作为OpenASR排行榜的一部分,其WER与Whisper相差在0.2%以内。
复现Distil-Whisper
复现Distil-Whisper的训练和评估代码可以在Distil-Whisper仓库中找到:https://github.com/huggingface/distil-whisper/tree/main/training
📄 许可证
Distil-Whisper继承了OpenAI的Whisper模型的MIT许可证。
引用
如果你使用了这个模型,请考虑引用Distil-Whisper论文:
@misc{gandhi2023distilwhisper,
      title={Distil-Whisper: Robust Knowledge Distillation via Large-Scale Pseudo Labelling},
      author={Sanchit Gandhi and Patrick von Platen and Alexander M. Rush},
      year={2023},
      eprint={2311.00430},
      archivePrefix={arXiv},
      primaryClass={cs.CL}
}
致谢
- OpenAI提供了Whisper 模型和原始代码库。
- Hugging Face 🤗 Transformers实现了模型集成。
- Google的TPU研究云(TRC)计划提供了Cloud TPU v4s。
@rsonavane在LibriSpeech数据集上发布了Distil-Whisper的早期版本。