%20--%3e%3cdefs%3e%3cstyle%3e%20.st0%20{%20fill:%20%23061b40;%20}%20.st1%20{%20fill:%20%23306af1;%20}%20.st2%20{%20fill:%20%235ce5cf;%20}%20%3c/style%3e%3c/defs%3e%3cg%3e%3cpath%20class='st0'%20d='M55,10.5h9v3h-9v9h12V7.5h-12v3ZM64,19.5h-6v-3h6v3Z'/%3e%3cpolygon%20class='st0'%20points='69%2016.5%2078%2016.5%2078%2019.5%2069%2019.5%2069%2022.5%2081%2022.5%2081%2013.5%2072%2013.5%2072%2010.5%2081%2010.5%2081%207.5%2069%207.5%2069%2016.5'/%3e%3cpolygon%20class='st0'%20points='95%2010.5%2095%207.5%2083%207.5%2083%2022.5%2095%2022.5%2095%2019.5%2086%2019.5%2086%2016.5%2095%2016.5%2095%2013.5%2086%2013.5%2086%2010.5%2095%2010.5'/%3e%3cpath%20class='st0'%20d='M40,1.5v21h11.6l1.4-1.4v-7.6h0c0,0-1.4-1.5-1.4-1.5l1.4-1.4V2.9l-1.4-1.4h-11.6ZM50,19.5h-7v-6h7v6ZM50,10.5h-7v-6h7v6Z'/%3e%3c/g%3e%3cpath%20class='st1'%20d='M23.1,24L14.7,4.8l-4.9,11.2h3.8l-1.8,4H3.3L12.1,0H2C.9,0,0,.9,0,2v20c0,1.1.9,2,2,2h21.1Z'/%3e%3cpath%20class='st2'%20d='M34,0h-16.8l10.6,24h6.2c1.1,0,2-.9,2-2V2C36,.9,35.1,0,34,0ZM32.5,20h-4V4h4v16Z'/%3e%3c/svg%3e)
模型概述
模型特點
模型能力
使用案例
🚀 Distil-Whisper: distil-large-v3
Distil-Whisper是在論文 Robust Knowledge Distillation via Large-Scale Pseudo Labelling 中提出的。這是Distil-Whisper英語系列的第三個也是最後一個版本,它是OpenAI的 Whisper large-v3 的知識蒸餾版本,Whisper large-v3是迄今為止最新且性能最佳的Whisper模型。
與之前的Distil-Whisper模型相比,distil-large-v3的蒸餾過程經過調整,結合OpenAI的 順序長格式算法 可實現 卓越的長格式轉錄準確性。最終得到的蒸餾模型在長格式音頻上使用順序和分塊算法時,其字錯率(WER)與large-v3相差不到1%,並且在使用順序算法時比distil-large-v2的WER低4.8%。該模型也比之前的Distil-Whisper模型更快:比large-v3快6.3倍,比distil-large-v2快1.1倍。
| 模型 | 參數數量(百萬) | 相對延遲 | 短格式 | 順序長格式 | 分塊長格式 |
|---|---|---|---|---|---|
| large-v3 | 1550 | 1.0 | 8.4 | 10.0 | 11.0 |
| distil-large-v3 | 756 | 6.3 | 9.7 | 10.8 | 10.9 |
| distil-large-v2 | 756 | 5.8 | 10.1 | 15.6 | 11.6 |
由於順序算法是最流行的Whisper庫(Whisper cpp、Faster-Whisper、OpenAI Whisper)中“事實上”的轉錄算法,因此這個蒸餾模型設計為與這些庫兼容。當使用這些庫時,從之前的Distil-Whisper檢查點切換到distil-large-v3,你可以期待顯著的性能提升。為了方便使用,最流行庫的權重已經轉換好,下面是使用說明。
🚀 快速開始
本項目是Distil-Whisper系列的distil-large-v3模型,是OpenAI的Whisper large-v3的知識蒸餾版本,在長格式轉錄準確性和速度上有顯著提升,且與多種流行庫兼容。以下是使用該模型的快速指南。
✨ 主要特性
- 卓越的長格式轉錄準確性:結合OpenAI的順序長格式算法,在長格式音頻轉錄上表現出色。
- 更快的推理速度:比Whisper large-v3快6.3倍,比distil-large-v2快1.1倍。
- 廣泛的兼容性:與多種流行的Whisper庫(如Whisper cpp、Faster-Whisper、OpenAI Whisper等)兼容。
- 支持多種算法:支持順序長格式、分塊長格式和推測解碼等算法。
📦 安裝指南
安裝Transformers庫
distil-large-v3從Hugging Face 🤗 Transformers庫的4.39版本開始支持。要運行該模型,首先需要安裝最新版本的Transformers庫。以下是安裝命令:
pip install --upgrade pip
pip install --upgrade transformers accelerate datasets[audio]
其他庫的安裝
根據不同的使用場景,可能還需要安裝其他庫,如Whisper.cpp、Faster-Whisper、OpenAI Whisper等,具體安裝步驟在後續使用示例中會詳細說明。
💻 使用示例
基礎用法
短格式轉錄
模型可以使用 pipeline 類對短格式音頻文件(< 30秒)進行轉錄,示例代碼如下:
import torch
from transformers import AutoModelForSpeechSeq2Seq, AutoProcessor, pipeline
from datasets import load_dataset

device = "cuda:0" if torch.cuda.is_available() else "cpu"
torch_dtype = torch.float16 if torch.cuda.is_available() else torch.float32

model_id = "distil-whisper/distil-large-v3"

model = AutoModelForSpeechSeq2Seq.from_pretrained(
    model_id, torch_dtype=torch_dtype, low_cpu_mem_usage=True, use_safetensors=True
)
model.to(device)

processor = AutoProcessor.from_pretrained(model_id)

pipe = pipeline(
    "automatic-speech-recognition",
    model=model,
    tokenizer=processor.tokenizer,
    feature_extractor=processor.feature_extractor,
    max_new_tokens=128,
    torch_dtype=torch_dtype,
    device=device,
)

dataset = load_dataset("hf-internal-testing/librispeech_asr_dummy", "clean", split="validation")
sample = dataset[0]["audio"]

result = pipe(sample)
print(result["text"])
要轉錄本地音頻文件,只需在調用pipeline時傳入音頻文件的路徑:
- result = pipe(sample)
+ result = pipe("audio.mp3")
要獲取分段級別的時間戳,傳入參數 return_timestamps=True 並返回 "chunks" 輸出:
result = pipe(sample, return_timestamps=True)
print(result["chunks"])
順序長格式轉錄
distil-large-v3專門設計為與OpenAI的順序長格式轉錄算法兼容。以下是使用 pipeline 類對長音頻文件進行順序轉錄的示例代碼:
import torch
from transformers import AutoModelForSpeechSeq2Seq, AutoProcessor, pipeline
from datasets import load_dataset

device = "cuda:0" if torch.cuda.is_available() else "cpu"
torch_dtype = torch.float16 if torch.cuda.is_available() else torch.float32

model_id = "distil-whisper/distil-large-v3"

model = AutoModelForSpeechSeq2Seq.from_pretrained(
    model_id, torch_dtype=torch_dtype, low_cpu_mem_usage=True, use_safetensors=True
)
model.to(device)

processor = AutoProcessor.from_pretrained(model_id)

pipe = pipeline(
    "automatic-speech-recognition",
    model=model,
    tokenizer=processor.tokenizer,
    feature_extractor=processor.feature_extractor,
    max_new_tokens=128,
    torch_dtype=torch_dtype,
    device=device,
)

dataset = load_dataset("distil-whisper/librispeech_long", "clean", split="validation")
sample = dataset[0]["audio"]

result = pipe(sample)
print(result["text"])
分塊長格式轉錄
distil-large-v3仍然與Transformers分塊長格式算法兼容。當需要轉錄單個大音頻文件並追求最快推理速度時,應使用此算法。以下是啟用分塊轉錄的示例代碼:
import torch
from transformers import AutoModelForSpeechSeq2Seq, AutoProcessor, pipeline
from datasets import load_dataset

device = "cuda:0" if torch.cuda.is_available() else "cpu"
torch_dtype = torch.float16 if torch.cuda.is_available() else torch.float32

model_id = "distil-whisper/distil-large-v3"

model = AutoModelForSpeechSeq2Seq.from_pretrained(
    model_id, torch_dtype=torch_dtype, low_cpu_mem_usage=True, use_safetensors=True
)
model.to(device)

processor = AutoProcessor.from_pretrained(model_id)

pipe = pipeline(
    "automatic-speech-recognition",
    model=model,
    tokenizer=processor.tokenizer,
    feature_extractor=processor.feature_extractor,
    max_new_tokens=128,
    chunk_length_s=25,
    batch_size=16,
    torch_dtype=torch_dtype,
    device=device,
)

dataset = load_dataset("distil-whisper/librispeech_long", "clean", split="validation")
sample = dataset[0]["audio"]

result = pipe(sample)
print(result["text"])
推測解碼
distil-large-v3是第一個可以作為Whisper large-v3的輔助模型用於 推測解碼 的Distil-Whisper模型。推測解碼在數學上保證了與Whisper相同的輸出,同時速度快2倍。以下是使用推測解碼的示例代碼:
from transformers import pipeline, AutoModelForCausalLM, AutoModelForSpeechSeq2Seq, AutoProcessor
import torch
from datasets import load_dataset

device = "cuda:0" if torch.cuda.is_available() else "cpu"
torch_dtype = torch.float16 if torch.cuda.is_available() else torch.float32

assistant_model_id = "distil-whisper/distil-large-v3"

assistant_model = AutoModelForCausalLM.from_pretrained(
    assistant_model_id, torch_dtype=torch_dtype, low_cpu_mem_usage=True, use_safetensors=True
)
assistant_model.to(device)

model_id = "openai/whisper-large-v3"

model = AutoModelForSpeechSeq2Seq.from_pretrained(
    model_id, torch_dtype=torch_dtype, low_cpu_mem_usage=True, use_safetensors=True
)
model.to(device)

processor = AutoProcessor.from_pretrained(model_id)

pipe = pipeline(
    "automatic-speech-recognition",
    model=model,
    tokenizer=processor.tokenizer,
    feature_extractor=processor.feature_extractor,
    max_new_tokens=128,
    generate_kwargs={"assistant_model": assistant_model},
    torch_dtype=torch_dtype,
    device=device,
)

dataset = load_dataset("hf-internal-testing/librispeech_asr_dummy", "clean", split="validation")
sample = dataset[0]["audio"]

result = pipe(sample)
print(result["text"])
高級用法
更多生成參數控制
若需要對生成參數進行更多控制,可以直接使用模型 + 處理器API。以下是示例代碼:
import torch
from transformers import AutoModelForSpeechSeq2Seq, AutoProcessor
from datasets import Audio, load_dataset

device = "cuda:0" if torch.cuda.is_available() else "cpu"
torch_dtype = torch.float16 if torch.cuda.is_available() else torch.float32

model_id = "distil-whisper/distil-large-v3"

model = AutoModelForSpeechSeq2Seq.from_pretrained(
    model_id, torch_dtype=torch_dtype, low_cpu_mem_usage=True, use_safetensors=True
)
model.to(device)

processor = AutoProcessor.from_pretrained(model_id)

dataset = load_dataset("hf-internal-testing/librispeech_asr_dummy", "clean", split="validation")
dataset = dataset.cast_column("audio", Audio(processor.feature_extractor.sampling_rate))
sample = dataset[0]["audio"]

input_features = processor(
  sample["array"], sampling_rate=sample["sampling_rate"], return_tensors="pt"
).input_features

input_features = input_features.to(device, dtype=torch_dtype)

gen_kwargs = {
  "max_new_tokens": 128,
  "num_beams": 1,
  "return_timestamps": False,
}

pred_ids = model.generate(input_features, **gen_kwargs)
pred_text = processor.batch_decode(pred_ids, skip_special_tokens=True, decode_with_timestamps=gen_kwargs["return_timestamps"])

print(pred_text)
額外的速度和內存優化
可以對Distil-Whisper應用額外的速度和內存優化,以進一步降低推理速度和顯存要求。主要有以下幾種優化方法:
Flash Attention 2
如果你的GPU支持,建議使用 Flash-Attention 2。首先需要安裝 Flash Attention:
pip install flash-attn --no-build-isolation
然後在 from_pretrained 中傳入 attn_implementation="flash_attention_2":
- model = AutoModelForSpeechSeq2Seq.from_pretrained(model_id, torch_dtype=torch_dtype, low_cpu_mem_usage=True, use_safetensors=True)
+ model = AutoModelForSpeechSeq2Seq.from_pretrained(model_id, torch_dtype=torch_dtype, low_cpu_mem_usage=True, use_safetensors=True, attn_implementation="flash_attention_2")
Torch Scale-Product-Attention (SDPA)
如果你的GPU不支持Flash Attention,建議使用PyTorch scaled dot-product attention (SDPA)。對於PyTorch 2.1.1或更高版本,此注意力實現默認啟用。可以使用以下代碼檢查是否有兼容的PyTorch版本:
from transformers.utils import is_torch_sdpa_available

print(is_torch_sdpa_available())
如果返回 True,則已安裝有效的PyTorch版本,SDPA默認啟用;如果返回 False,則需要根據 官方說明 升級PyTorch版本。安裝有效版本後,SDPA默認啟用,也可以通過指定 attn_implementation="sdpa" 顯式設置:
- model = AutoModelForSpeechSeq2Seq.from_pretrained(model_id, torch_dtype=torch_dtype, low_cpu_mem_usage=True, use_safetensors=True)
+ model = AutoModelForSpeechSeq2Seq.from_pretrained(model_id, torch_dtype=torch_dtype, low_cpu_mem_usage=True, use_safetensors=True, attn_implementation="sdpa")
📚 詳細文檔
與其他庫的集成
Whisper.cpp
Distil-Whisper可以使用 Whisper.cpp 包結合原始順序長格式轉錄算法運行。在Mac M1上的臨時基準測試中,distil-large-v3比Whisper large-v3快5倍以上,在長格式音頻上的WER相差不到0.8%。以下是使用步驟:
- 克隆Whisper.cpp倉庫:
git clone https://github.com/ggerganov/whisper.cpp.git
cd whisper.cpp
- 安裝Hugging Face Hub Python包:
pip install --upgrade huggingface_hub
使用以下Python代碼片段下載distil-large-v3的GGML權重:
from huggingface_hub import hf_hub_download

hf_hub_download(repo_id='distil-whisper/distil-large-v3-ggml', filename='ggml-distil-large-v3.bin', local_dir='./models')
如果你沒有設置Python環境,也可以使用 wget 直接下載權重:
wget https://huggingface.co/distil-whisper/distil-large-v3-ggml/resolve/main/ggml-distil-large-v3.bin -P ./models
- 使用提供的示例音頻運行推理:
make -j && ./main -m models/ggml-distil-large-v3.bin -f samples/jfk.wav
Faster-Whisper
Faster-Whisper是使用 CTranslate2 重新實現的Whisper,是一個快速的Transformer模型推理引擎。首先,根據 官方說明 安裝Faster-Whisper包。以下是使用示例代碼:
import torch
from faster_whisper import WhisperModel
from datasets import load_dataset

# define our torch configuration
device = "cuda:0" if torch.cuda.is_available() else "cpu"
compute_type = "float16" if torch.cuda.is_available() else "float32"

# load model on GPU if available, else cpu
model = WhisperModel("distil-large-v3", device=device, compute_type=compute_type)

# load toy dataset for example
dataset = load_dataset("hf-internal-testing/librispeech_asr_dummy", "clean", split="validation")
sample = dataset[1]["audio"]["path"]

segments, info = model.transcribe(sample, beam_size=1)

for segment in segments:
    print("[%.2fs -> %.2fs] %s" % (segment.start, segment.end, segment.text))
要轉錄本地音頻文件,只需在 transcribe 中傳入音頻文件的路徑:
segments, info = model.transcribe("audio.mp3", beam_size=1)
OpenAI Whisper
要使用原始Whisper格式的模型,首先確保安裝了 openai-whisper 包。以下是使用示例代碼:
from huggingface_hub import hf_hub_download
from datasets import load_dataset
from whisper import load_model, transcribe

model_path = hf_hub_download(repo_id="distil-whisper/distil-large-v3-openai", filename="model.bin")
model = load_model(model_path)

dataset = load_dataset("hf-internal-testing/librispeech_asr_dummy", "clean", split="validation")
sample = dataset[0]["audio"]["path"]

pred_out = transcribe(model, audio=sample, language="en")
print(pred_out["text"])
注意,第一次運行示例時,模型權重將被下載並保存到緩存中。隨後可以重複使用相同的示例,權重將直接從緩存中加載,無需再次下載。要轉錄本地音頻文件,只需在 transcribe 中傳入音頻文件的路徑:
pred_out = transcribe(model, audio=sample, language="en")
Distil-Whisper模型也可以與OpenAI Whisper CLI一起使用,具體說明請參考 這裡。
Transformers.js
Distil-Whisper可以使用 Transformers.js 完全在你的Web瀏覽器中運行。以下是使用步驟:
- 從 NPM 安裝Transformers.js:
npm i @xenova/transformers
- 導入庫並使用pipeline API進行推理:
import { pipeline } from '@xenova/transformers';

const transcriber = await pipeline('automatic-speech-recognition', 'distil-whisper/distil-large-v3');

const url = 'https://huggingface.co/datasets/Xenova/transformers.js-docs/resolve/main/jfk.wav';
const output = await transcriber(url);
// { text: " And so, my fellow Americans, ask not what your country can do for you. Ask what you can do for your country." }
可以嘗試在線 Distil-Whisper Web演示,它在你的瀏覽器中本地運行,無需服務器!更多信息請參考Transformers.js 文檔。
Candle
通過與Hugging Face Candle 🕯️ 的集成,Distil-Whisper可用於Rust庫 🦀。以下是使用步驟:
- 按照 這裡 的說明安裝
candle-core。 - 本地克隆
candle倉庫:
git clone https://github.com/huggingface/candle.git
- 進入 Whisper 示例目錄:
cd candle/candle-examples/examples/whisper
- 運行示例:
cargo run --example whisper --release --features symphonia -- --model distil-large-v3
- 要指定自己的音頻文件,添加
--input標誌:
cargo run --example whisper --release --features symphonia -- --model distil-large-v3 --input audio.wav
提示:如果使用Apple Metal編譯,在運行示例時指定 metal 特性:
cargo run --example whisper --release --features="symphonia,metal" -- --model distil-large-v3
如果遇到以下錯誤:
error: target `whisper` in package `candle-examples` requires the features: `symphonia`
Consider enabling them by passing, e.g., `--features="symphonia"`
你應該清理 cargo 安裝:
cargo clean
然後重新編譯:
cargo run --example whisper --release --features symphonia -- --model distil-large-v3
模型評估
以下是在LibriSpeech驗證-clean數據集上使用 流式模式 評估Distil-Whisper模型的示例代碼,這意味著無需將音頻數據下載到本地設備:
from transformers import AutoModelForSpeechSeq2Seq, AutoProcessor
from datasets import load_dataset
from evaluate import load
import torch
from tqdm import tqdm

# define our torch configuration
device = "cuda:0" if torch.cuda.is_available() else "cpu"
torch_dtype = torch.float16 if torch.cuda.is_available() else torch.float32

model_id = "distil-whisper/distil-large-v3"

# load the model + processor
model =  AutoModelForSpeechSeq2Seq.from_pretrained(model_id, torch_dtype=torch_dtype, use_safetensors=True, low_cpu_mem_usage=True)
model = model.to(device)
processor = AutoProcessor.from_pretrained(model_id)

# load the dataset with streaming mode
dataset = load_dataset("librispeech_asr", "clean", split="validation", streaming=True)

# define the evaluation metric
wer_metric = load("wer")

def inference(batch):
    # 1. Pre-process the audio data to log-mel spectrogram inputs
    audio = [sample["array"] for sample in batch["audio"]]
    input_features = processor(audio, sampling_rate=batch["audio"][0]["sampling_rate"], return_tensors="pt").input_features
    input_features = input_features.to(device, dtype=torch_dtype)

    # 2. Auto-regressively generate the predicted token ids
    pred_ids = model.generate(input_features, max_new_tokens=128)

    # 3. Decode the token ids to the final transcription
    batch["transcription"] = processor.batch_decode(pred_ids, skip_special_tokens=True)
    batch["reference"] = batch["text"]
    return batch

# batch size 16 inference
dataset = dataset.map(function=inference, batched=True, batch_size=16)

all_transcriptions = []
all_references = []

# iterate over the dataset and run inference
for result in tqdm(dataset, desc="Evaluating..."):
    all_transcriptions.append(result["transcription"])
    all_references.append(result["reference"])

# normalize predictions and references
all_transcriptions = [processor.normalize(transcription) for transcription in all_transcriptions]
all_references = [processor.normalize(reference) for reference in all_references]

# compute the WER metric
wer = 100 * wer_metric.compute(predictions=all_transcriptions, references=all_references)
print(wer)
打印輸出:
2.428920763531516
預期用途
Distil-Whisper旨在作為Whisper large-v3在英語語音識別中的直接替代品。特別是,它在分佈外(OOD)測試數據上實現了相當的WER結果,同時在短格式和長格式音頻上快6倍。
數據
Distil-Whisper在Hugging Face Hub上的九個開源、許可寬鬆的語音數據集的22,000小時音頻數據上進行訓練:
| 數據集 | 大小(小時) | 說話者數量 | 領域 | 許可證 |
|---|---|---|---|---|
| People's Speech | 12,000 | 未知 | Internet Archive | CC-BY-SA-4.0 |
| Common Voice 13 | 3,000 | 未知 | Narrated Wikipedia | CC0-1.0 |
| GigaSpeech | 2,500 | 未知 | Audiobook, podcast, YouTube | apache-2.0 |
| Fisher | 1,960 | 11,900 | Telephone conversations | LDC |
| LibriSpeech | 960 | 2,480 | Audiobooks | CC-BY-4.0 |
| VoxPopuli | 540 | 1,310 | European Parliament | CC0 |
| TED-LIUM | 450 | 2,030 | TED talks | CC-BY-NC-ND 3.0 |
| SwitchBoard | 260 | 540 | Telephone conversations | LDC |
| AMI | 100 | 未知 | Meetings | CC-BY-4.0 |
| 總計 | 21,770 | 18,260+ |
組合數據集涵蓋10個不同領域和超過50k個說話者。這個數據集的多樣性對於確保蒸餾模型對音頻分佈和噪聲具有魯棒性至關重要。然後,使用Whisper large-v3模型對音頻數據進行偽標籤:我們使用Whisper為訓練集中的所有音頻生成預測,並在訓練期間將這些預測用作目標標籤。使用偽標籤確保轉錄在數據集之間格式一致,並在訓練期間提供序列級蒸餾信號。
WER過濾
Whisper偽標籤預測可能存在誤轉錄和幻覺問題。為了確保只在準確的偽標籤上進行訓練,我們在訓練期間採用了簡單的WER啟發式方法。首先,對Whisper偽標籤和每個數據集提供的真實標籤進行歸一化。然後計算這些標籤之間的WER。如果WER超過指定閾值,則丟棄該訓練示例;否則,保留用於訓練。Distil-Whisper論文 的第9.2節展示了此過濾器對於提高蒸餾模型下游性能的有效性。我們還部分將Distil-Whisper對幻覺的魯棒性歸因於這個過濾器。
訓練
模型在批量大小為256的情況下進行了80,000次優化步驟(或11個週期)的訓練。Tensorboard訓練日誌可以在以下鏈接找到:https://huggingface.co/distil-whisper/distil-large-v3/tensorboard?params=scalars#frame
結果
蒸餾模型在分佈外(OOD)短格式音頻上的WER與Whisper large-v3相差不到1.5%,在順序長格式解碼上相差不到1%,在分塊長格式上比large-v3高0.1%。這種性能提升歸因於更低的幻覺率。有關每個數據集評估結果的詳細細分,請參考 Distil-Whisper論文 的表16和表17。Distil-Whisper還在 ESB基準 數據集上進行了評估,作為 OpenASR排行榜 的一部分,其WER與Whisper相差不到0.2%。
復現Distil-Whisper
復現Distil-Whisper的訓練和評估代碼可在Distil-Whisper倉庫中找到:https://github.com/huggingface/distil-whisper/tree/main/training。此代碼將很快更新,以包含 與distil-large-v2的差異 部分中描述的訓練更新。
🔧 技術細節
模型架構
Distil-Whisper繼承了Whisper的編碼器 - 解碼器架構。編碼器將語音向量輸入序列映射到隱藏狀態向量序列。解碼器根據所有先前的標記和編碼器隱藏狀態自迴歸地預測文本標記。因此,編碼器只向前運行一次,而解碼器運行的次數與生成的標記數量相同。實際上,這意味著解碼器佔總推理時間的90%以上。因此,為了優化延遲,重點是最小化解碼器的推理時間。 為了蒸餾Whisper模型,我們在保持編碼器固定的同時減少解碼器層數。編碼器(以綠色顯示)從教師模型完全複製到學生模型,並在訓練期間凍結。學生的解碼器由教師解碼器層的一個子集組成,這些層從最大間隔的層初始化。然後,模型在KL散度和偽標籤損失項的加權和上進行訓練。
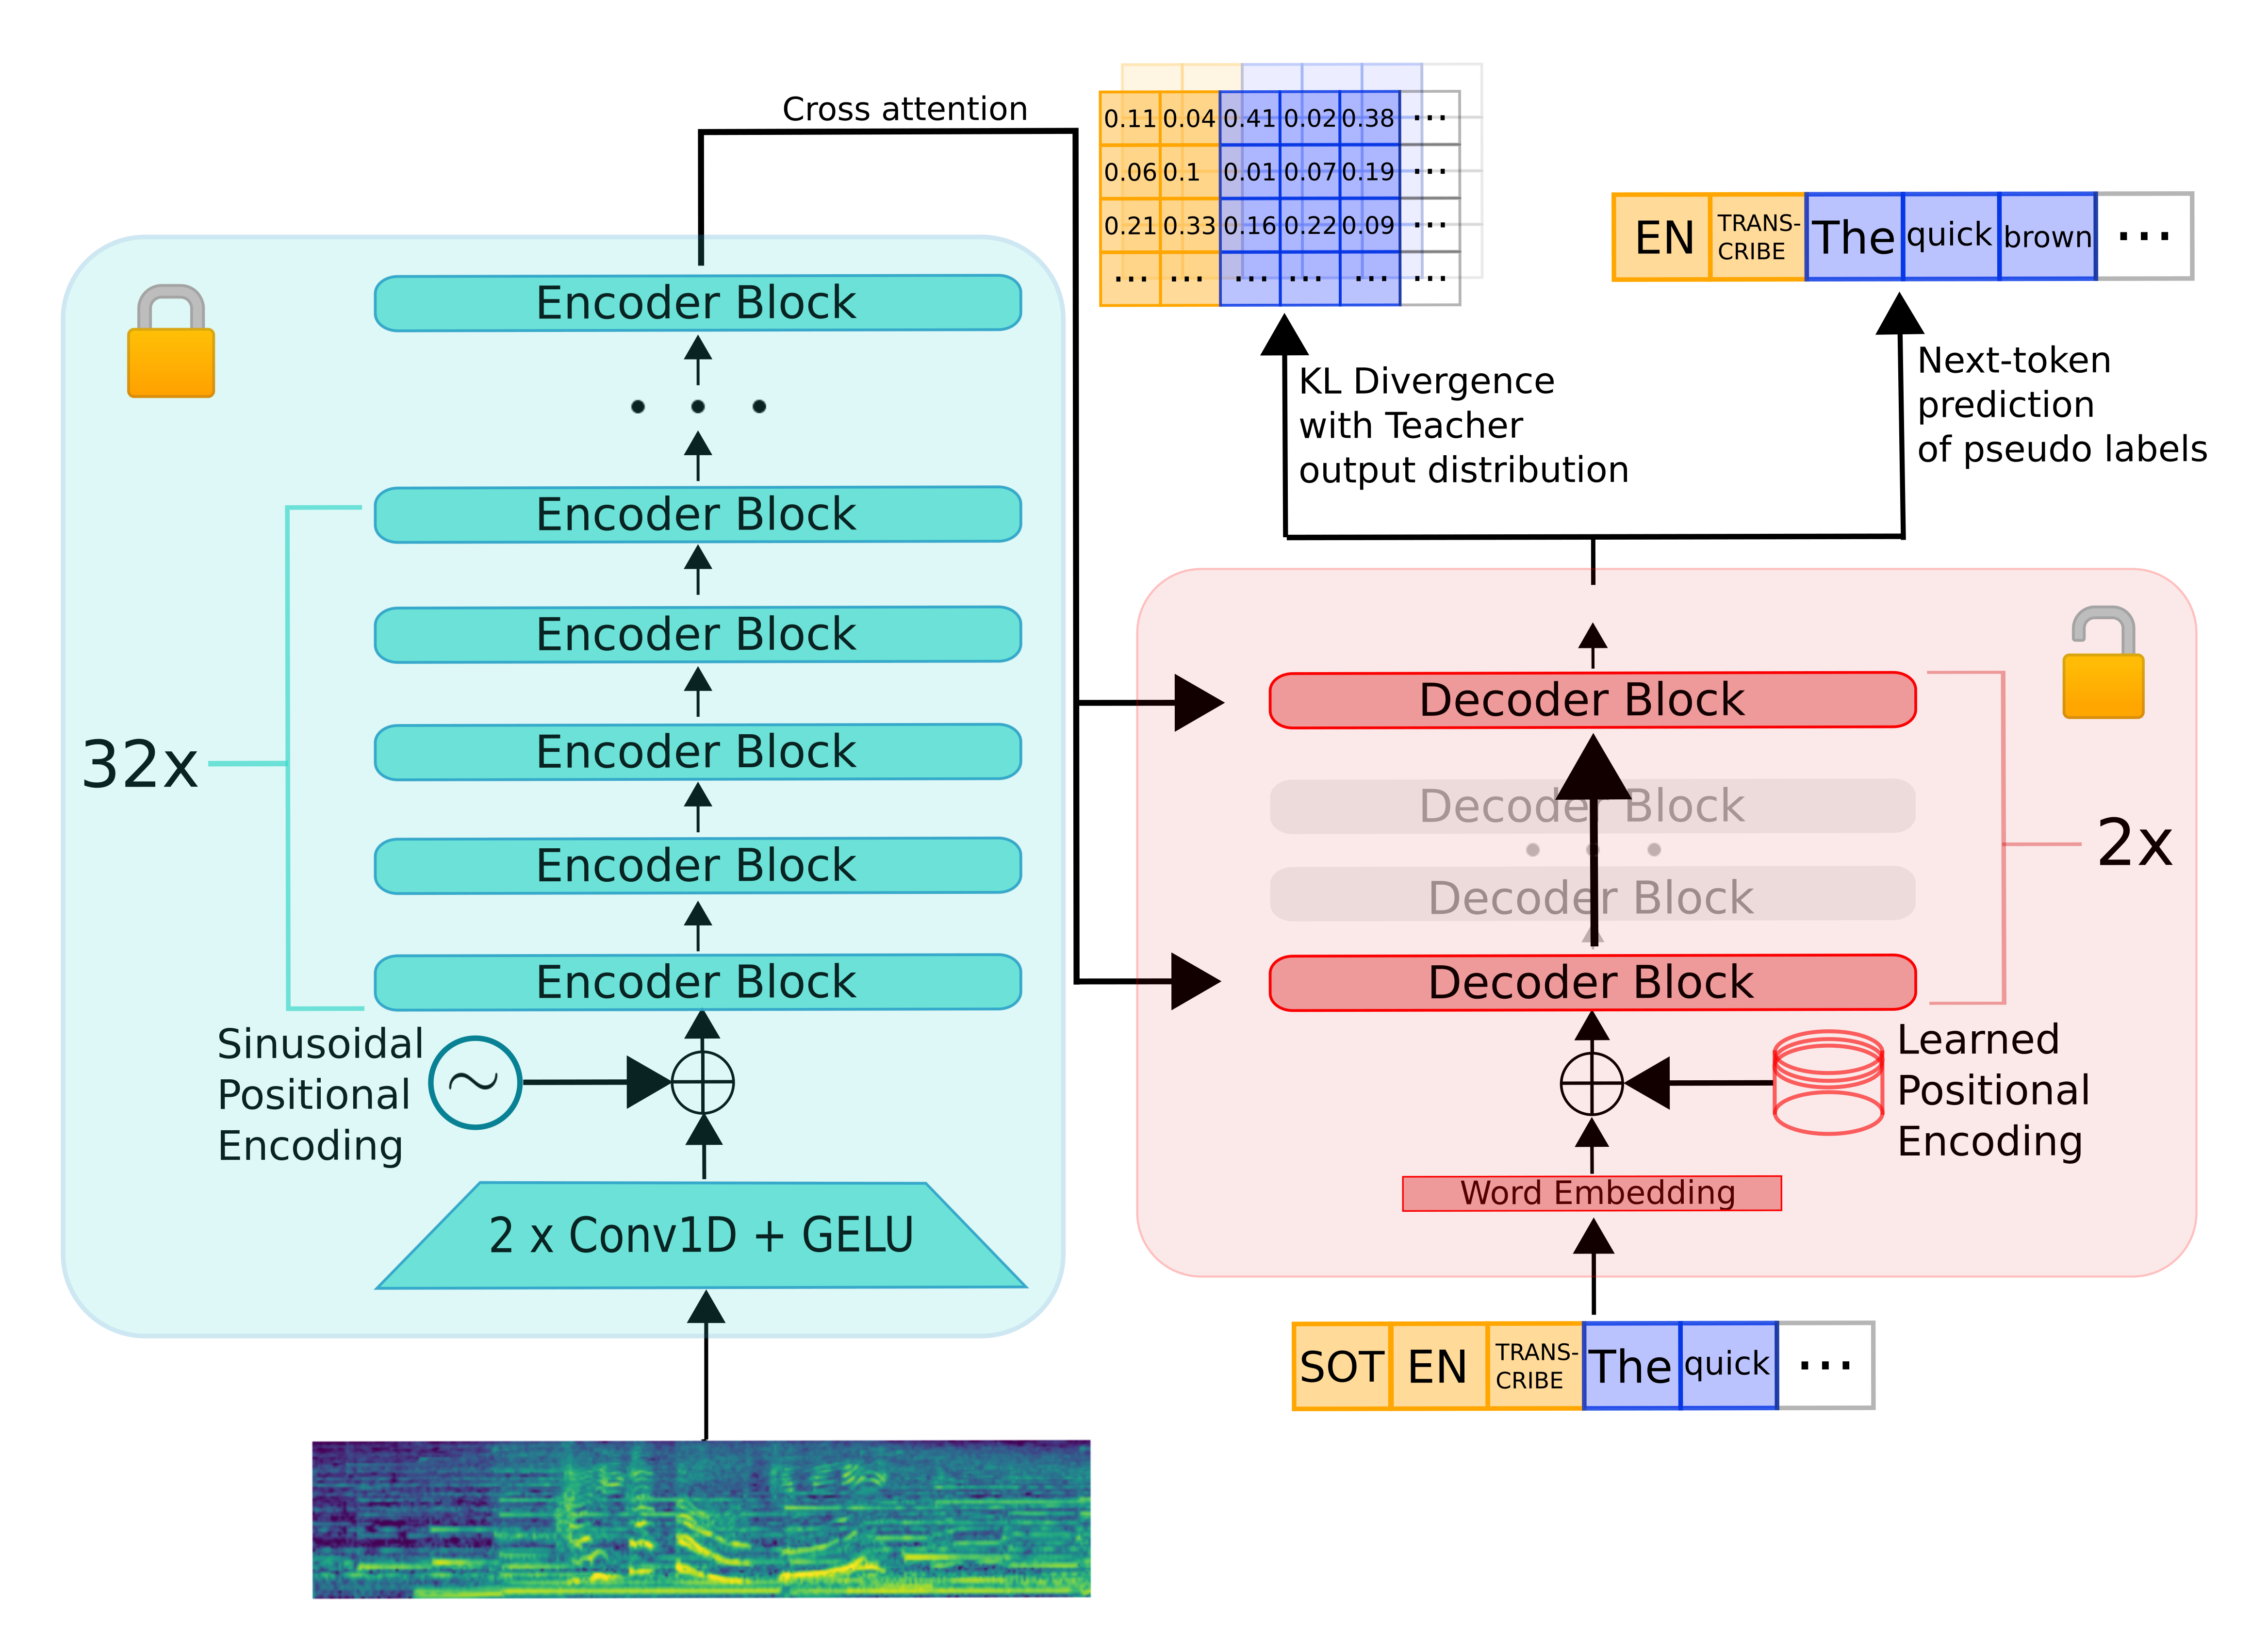
在順序解碼算法下,還採用了其他技巧來提高distil-large-v3的性能,這些技巧將在即將發佈的博客文章中詳細解釋。
📄 許可證
Distil-Whisper繼承了OpenAI的Whisper模型的 MIT許可證。
引用
如果你使用此模型,請考慮引用 Distil-Whisper論文:
@misc{gandhi2023distilwhisper,
      title={Distil-Whisper: Robust Knowledge Distillation via Large-Scale Pseudo Labelling},
      author={Sanchit Gandhi and Patrick von Platen and Alexander M. Rush},
      year={2023},
      eprint={2311.00430},
      archivePrefix={arXiv},
      primaryClass={cs.CL}
}
致謝
- OpenAI提供了Whisper 模型,特別是Jong Wook Kim提供了 原始代碼庫 並參與了訓練討論。
- Hugging Face 🤗 Transformers 實現了模型集成。
- Georgi Gerganov 實現了Whisper cpp集成。
- Systran團隊 實現了Faster-Whisper集成。
- Joshua Lochner 實現了Transformers.js集成。
- Laurent Mazare 實現了Candle集成。
- Vaibhav Srivastav 負責Distil-Whisper的分發。
- Google的 TPU Research Cloud (TRC) 計劃提供了Cloud TPU v4計算資源。
- Raghav Sonavane 提供了Distil-Whisper在LibriSpeech數據集上的早期版本。