%20--%3e%3cdefs%3e%3cstyle%3e%20.st0%20{%20fill:%20%23061b40;%20}%20.st1%20{%20fill:%20%23306af1;%20}%20.st2%20{%20fill:%20%235ce5cf;%20}%20%3c/style%3e%3c/defs%3e%3cg%3e%3cpath%20class='st0'%20d='M55,10.5h9v3h-9v9h12V7.5h-12v3ZM64,19.5h-6v-3h6v3Z'/%3e%3cpolygon%20class='st0'%20points='69%2016.5%2078%2016.5%2078%2019.5%2069%2019.5%2069%2022.5%2081%2022.5%2081%2013.5%2072%2013.5%2072%2010.5%2081%2010.5%2081%207.5%2069%207.5%2069%2016.5'/%3e%3cpolygon%20class='st0'%20points='95%2010.5%2095%207.5%2083%207.5%2083%2022.5%2095%2022.5%2095%2019.5%2086%2019.5%2086%2016.5%2095%2016.5%2095%2013.5%2086%2013.5%2086%2010.5%2095%2010.5'/%3e%3cpath%20class='st0'%20d='M40,1.5v21h11.6l1.4-1.4v-7.6h0c0,0-1.4-1.5-1.4-1.5l1.4-1.4V2.9l-1.4-1.4h-11.6ZM50,19.5h-7v-6h7v6ZM50,10.5h-7v-6h7v6Z'/%3e%3c/g%3e%3cpath%20class='st1'%20d='M23.1,24L14.7,4.8l-4.9,11.2h3.8l-1.8,4H3.3L12.1,0H2C.9,0,0,.9,0,2v20c0,1.1.9,2,2,2h21.1Z'/%3e%3cpath%20class='st2'%20d='M34,0h-16.8l10.6,24h6.2c1.1,0,2-.9,2-2V2C36,.9,35.1,0,34,0ZM32.5,20h-4V4h4v16Z'/%3e%3c/svg%3e)
EN
Kosmos 2 Patch14 224
Kosmos-2是一个多模态大语言模型,能够将语言模型与现实世界视觉元素进行锚定,支持多种视觉-语言任务。
Downloads 62
Release Time : 7/29/2023
Model Overview
Kosmos-2是微软开发的多模态大语言模型,能够理解图像内容并将其与文本描述关联。它可以执行多种视觉-语言任务,包括图像描述、视觉问答、多模态指代等。
Model Features
多模态锚定
能够将文本短语与图像中的视觉元素进行精确锚定
指代表达理解
可以理解并定位图像中特定区域对应的指代表达
多模态指代生成
能够生成描述图像中特定区域的指代表达
视觉问答
可以回答关于图像内容的自然语言问题
Model Capabilities
图像内容理解
视觉-语言关联
图像描述生成
视觉问答
多模态指代
实体边界框标注
Use Cases
图像理解
图像描述
为输入图像生成详细或简洁的描述
生成包含图像中主要实体及其关系的自然语言描述
视觉问答
回答关于图像内容的自然语言问题
准确回答关于图像中实体、关系和场景的问题
多模态交互
指代表达理解
理解并定位图像中特定区域对应的指代表达
准确识别图像中与文本短语对应的区域
指代表达生成
为图像中的特定区域生成指代表达
生成描述图像中特定区域的自然语言短语
🚀 Kosmos-2:将多模态大语言模型与现实世界相连接
Kosmos-2 是一款多模态大语言模型,它能够处理图像和文本信息,实现诸如多模态定位、多模态指称、感知语言任务和图像描述等功能。通过改变输入提示,模型可以执行不同的任务,为多模态交互提供了强大的支持。
注意事项
⚠️ 重要提示
此模型(Hub 上的远程代码)已弃用。请使用 https://huggingface.co/microsoft/kosmos-2-patch14-224。
在输入格式方面有一些变化,请参阅 https://huggingface.co/microsoft/kosmos-2-patch14-224 中的模型卡片。
示例图片
🚀 快速开始
此 Hub 仓库包含了来自微软的 原始 Kosmos-2 模型 的 HuggingFace transformers 实现。使用以下代码开始使用该模型:
import requests
from PIL import Image
from transformers import AutoProcessor, AutoModelForVision2Seq
model = AutoModelForVision2Seq.from_pretrained("ydshieh/kosmos-2-patch14-224", trust_remote_code=True)
processor = AutoProcessor.from_pretrained("ydshieh/kosmos-2-patch14-224", trust_remote_code=True)
prompt = "<grounding>An image of"
url = "https://huggingface.co/ydshieh/kosmos-2-patch14-224/resolve/main/snowman.png"
image = Image.open(requests.get(url, stream=True).raw)
# 原始的 Kosmos-2 演示会先保存图像,然后重新加载它。对于某些图像,这会导致略微不同的图像输入,并改变生成输出。
# 如果您想匹配原始演示的输出,请取消注释以下 2 行。
# (演示中的 `two_dogs.jpg` 就是一个例子)
# image.save("new_image.jpg")
# image = Image.open("new_image.jpg")
inputs = processor(text=prompt, images=image, return_tensors="pt")
generated_ids = model.generate(
pixel_values=inputs["pixel_values"],
input_ids=inputs["input_ids"][:, :-1],
attention_mask=inputs["attention_mask"][:, :-1],
img_features=None,
img_attn_mask=inputs["img_attn_mask"][:, :-1],
use_cache=True,
max_new_tokens=64,
)
generated_text = processor.batch_decode(generated_ids, skip_special_tokens=True)[0]
# 指定 `cleanup_and_extract=False` 以查看原始的模型生成结果。
processed_text = processor.post_process_generation(generated_text, cleanup_and_extract=False)
print(processed_text)
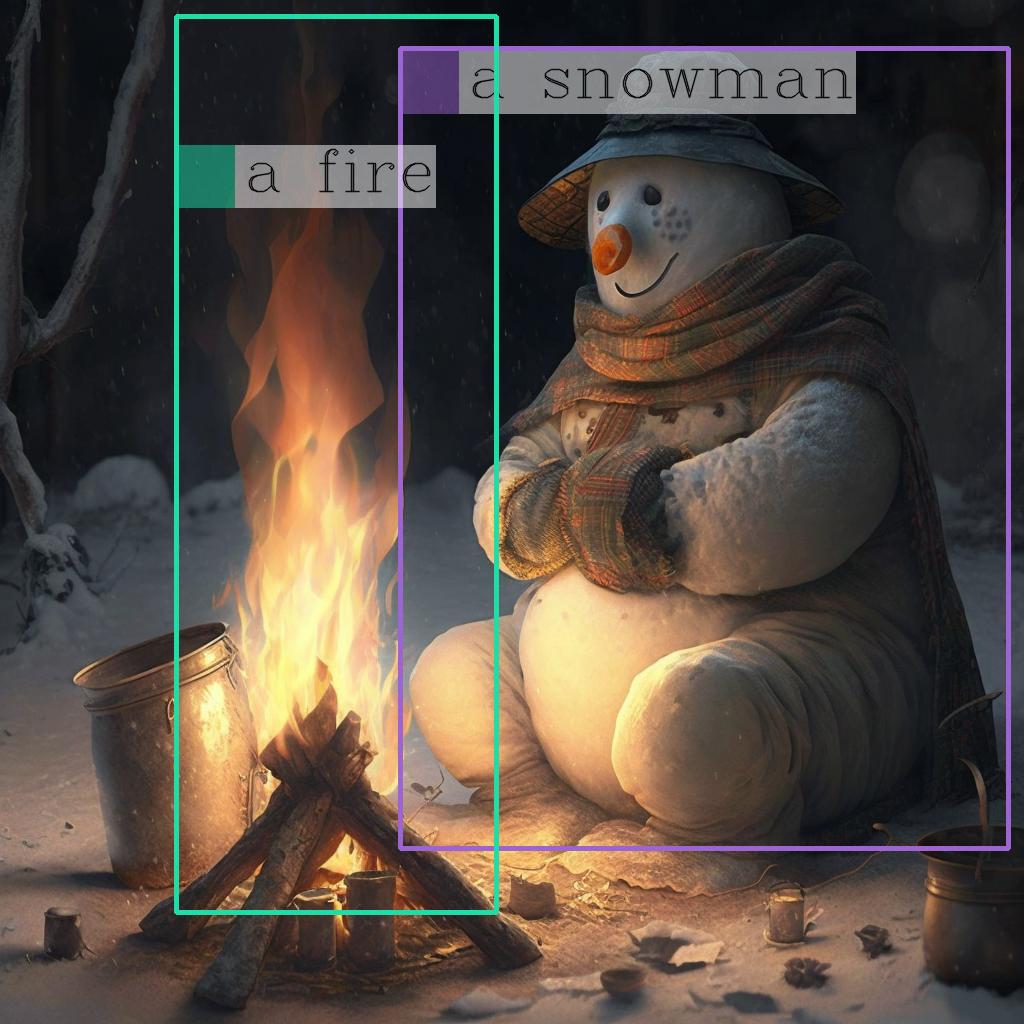
# `<grounding> An image of<phrase> a snowman</phrase><object><patch_index_0044><patch_index_0863></object> warming himself by<phrase> a fire</phrase><object><patch_index_0005><patch_index_0911></object>.`
# 默认情况下,生成的文本会被清理,实体也会被提取。
processed_text, entities = processor.post_process_generation(generated_text)
print(processed_text)
# `An image of a snowman warming himself by a fire.`
print(entities)
# `[('a snowman', (12, 21), [(0.390625, 0.046875, 0.984375, 0.828125)]), ('a fire', (41, 47), [(0.171875, 0.015625, 0.484375, 0.890625)])]`
💻 使用示例
基础用法
在图像上绘制实体的边界框
import cv2
import numpy as np
import os
import requests
import torch
import torchvision.transforms as T

from PIL import Image


def is_overlapping(rect1, rect2):
    x1, y1, x2, y2 = rect1
    x3, y3, x4, y4 = rect2
    return not (x2 < x3 or x1 > x4 or y2 < y3 or y1 > y4)


def draw_entity_boxes_on_image(image, entities, show=False, save_path=None):
    """_summary_
    Args:
        image (_type_): 图像或图像路径
        collect_entity_location (_type_): _description_
    """
    if isinstance(image, Image.Image):
        image_h = image.height
        image_w = image.width
        image = np.array(image)[:, :, [2, 1, 0]]
    elif isinstance(image, str):
        if os.path.exists(image):
            pil_img = Image.open(image).convert("RGB")
            image = np.array(pil_img)[:, :, [2, 1, 0]]
            image_h = pil_img.height
            image_w = pil_img.width
        else:
            raise ValueError(f"无效的图像路径,{image}")
    elif isinstance(image, torch.Tensor):
        # pdb.set_trace()
        image_tensor = image.cpu()
        reverse_norm_mean = torch.tensor([0.48145466, 0.4578275, 0.40821073])[:, None, None]
        reverse_norm_std = torch.tensor([0.26862954, 0.26130258, 0.27577711])[:, None, None]
        image_tensor = image_tensor * reverse_norm_std + reverse_norm_mean
        pil_img = T.ToPILImage()(image_tensor)
        image_h = pil_img.height
        image_w = pil_img.width
        image = np.array(pil_img)[:, :, [2, 1, 0]]
    else:
        raise ValueError(f"无效的图像格式,{type(image)} 对应于 {image}")

    if len(entities) == 0:
        return image

    new_image = image.copy()
    previous_bboxes = []
    # 文本大小
    text_size = 1
    # 文本粗细
    text_line = 1  # int(max(1 * min(image_h, image_w) / 512, 1))
    box_line = 3
    (c_width, text_height), _ = cv2.getTextSize("F", cv2.FONT_HERSHEY_COMPLEX, text_size, text_line)
    base_height = int(text_height * 0.675)
    text_offset_original = text_height - base_height
    text_spaces = 3

    for entity_name, (start, end), bboxes in entities:
        for (x1_norm, y1_norm, x2_norm, y2_norm) in bboxes:
            orig_x1, orig_y1, orig_x2, orig_y2 = int(x1_norm * image_w), int(y1_norm * image_h), int(x2_norm * image_w), int(y2_norm * image_h)
            # 绘制边界框
            # 随机颜色
            color = tuple(np.random.randint(0, 255, size=3).tolist())
            new_image = cv2.rectangle(new_image, (orig_x1, orig_y1), (orig_x2, orig_y2), color, box_line)

            l_o, r_o = box_line // 2 + box_line % 2, box_line // 2 + box_line % 2 + 1

            x1 = orig_x1 - l_o
            y1 = orig_y1 - l_o

            if y1 < text_height + text_offset_original + 2 * text_spaces:
                y1 = orig_y1 + r_o + text_height + text_offset_original + 2 * text_spaces
                x1 = orig_x1 + r_o

            # 添加文本背景
            (text_width, text_height), _ = cv2.getTextSize(f"  {entity_name}", cv2.FONT_HERSHEY_COMPLEX, text_size, text_line)
            text_bg_x1, text_bg_y1, text_bg_x2, text_bg_y2 = x1, y1 - (text_height + text_offset_original + 2 * text_spaces), x1 + text_width, y1

            for prev_bbox in previous_bboxes:
                while is_overlapping((text_bg_x1, text_bg_y1, text_bg_x2, text_bg_y2), prev_bbox):
                    text_bg_y1 += (text_height + text_offset_original + 2 * text_spaces)
                    text_bg_y2 += (text_height + text_offset_original + 2 * text_spaces)
                    y1 += (text_height + text_offset_original + 2 * text_spaces)

                    if text_bg_y2 >= image_h:
                        text_bg_y1 = max(0, image_h - (text_height + text_offset_original + 2 * text_spaces))
                        text_bg_y2 = image_h
                        y1 = image_h
                        break

            alpha = 0.5
            for i in range(text_bg_y1, text_bg_y2):
                for j in range(text_bg_x1, text_bg_x2):
                    if i < image_h and j < image_w:
                        if j < text_bg_x1 + 1.35 * c_width:
                            # 原始颜色
                            bg_color = color
                        else:
                            # 白色
                            bg_color = [255, 255, 255]
                        new_image[i, j] = (alpha * new_image[i, j] + (1 - alpha) * np.array(bg_color)).astype(np.uint8)

            cv2.putText(
                new_image, f"  {entity_name}", (x1, y1 - text_offset_original - 1 * text_spaces), cv2.FONT_HERSHEY_COMPLEX, text_size, (0, 0, 0), text_line, cv2.LINE_AA
            )
            # previous_locations.append((x1, y1))
            previous_bboxes.append((text_bg_x1, text_bg_y1, text_bg_x2, text_bg_y2))

    pil_image = Image.fromarray(new_image[:, :, [2, 1, 0]])
    if save_path:
        pil_image.save(save_path)
    if show:
        pil_image.show()

    return new_image


# (与上一个代码示例中的图像相同)
url = "https://huggingface.co/ydshieh/kosmos-2-patch14-224/resolve/main/snowman.jpg"
image = Image.open(requests.get(url, stream=True).raw)

# 从上一个代码示例中获取
entities = [('a snowman', (12, 21), [(0.390625, 0.046875, 0.984375, 0.828125)]), ('a fire', (41, 47), [(0.171875, 0.015625, 0.484375, 0.890625)])]

# 绘制边界框
draw_entity_boxes_on_image(image, entities, show=True)
高级用法
通过改变提示执行不同任务
import requests

from PIL import Image
from transformers import AutoProcessor, AutoModelForVision2Seq


model = AutoModelForVision2Seq.from_pretrained("ydshieh/kosmos-2-patch14-224", trust_remote_code=True)
processor = AutoProcessor.from_pretrained("ydshieh/kosmos-2-patch14-224", trust_remote_code=True)

url = "https://huggingface.co/ydshieh/kosmos-2-patch14-224/resolve/main/snowman.png"
image = Image.open(requests.get(url, stream=True).raw)

def run_example(prompt):

    inputs = processor(text=prompt, images=image, return_tensors="pt")
    generated_ids = model.generate(
        pixel_values=inputs["pixel_values"],
        input_ids=inputs["input_ids"][:, :-1],
        attention_mask=inputs["attention_mask"][:, :-1],
        img_features=None,
        img_attn_mask=inputs["img_attn_mask"][:, :-1],
        use_cache=True,
        max_new_tokens=64,
    )
    generated_text = processor.batch_decode(generated_ids, skip_special_tokens=True)[0]
    _processed_text = processor.post_process_generation(generated_text, cleanup_and_extract=False)
    processed_text, entities = processor.post_process_generation(generated_text)
    print(processed_text)
    print(entities)
    print(_processed_text)
多模态定位
• 短语定位
prompt = "<grounding><phrase> a snowman</phrase>"
run_example(prompt)

# a snowman is warming himself by the fire
# [('a snowman', (0, 9), [(0.390625, 0.046875, 0.984375, 0.828125)]), ('the fire', (32, 40), [(0.203125, 0.015625, 0.453125, 0.859375)])]

# <grounding><phrase> a snowman</phrase><object><patch_index_0044><patch_index_0863></object> is warming himself by<phrase> the fire</phrase><object><patch_index_0006><patch_index_0878></object>
• 指代表达理解
prompt = "<grounding><phrase> a snowman next to a fire</phrase>"
run_example(prompt)

# a snowman next to a fire
# [('a snowman next to a fire', (0, 24), [(0.390625, 0.046875, 0.984375, 0.828125)])]

# <grounding><phrase> a snowman next to a fire</phrase><object><patch_index_0044><patch_index_0863></object>
多模态指称
• 指代表达生成
prompt = "<grounding><phrase> It</phrase><object><patch_index_0044><patch_index_0863></object> is"
run_example(prompt)

# It is snowman in a hat and scarf
# [('It', (0, 2), [(0.390625, 0.046875, 0.984375, 0.828125)])]

# <grounding><phrase> It</phrase><object><patch_index_0044><patch_index_0863></object> is snowman in a hat and scarf
感知语言任务
• 定位视觉问答
prompt = "<grounding> Question: What is special about this image? Answer:"
run_example(prompt)

# Question: What is special about this image? Answer: The image features a snowman sitting by a campfire in the snow.
# [('a snowman', (71, 80), [(0.390625, 0.046875, 0.984375, 0.828125)]), ('a campfire', (92, 102), [(0.109375, 0.640625, 0.546875, 0.984375)])]

# <grounding> Question: What is special about this image? Answer: The image features<phrase> a snowman</phrase><object><patch_index_0044><patch_index_0863></object> sitting by<phrase> a campfire</phrase><object><patch_index_0643><patch_index_1009></object> in the snow.
• 通过边界框进行多模态指称的定位视觉问答
prompt = "<grounding> Question: Where is<phrase> the fire</phrase><object><patch_index_0005><patch_index_0911></object> next to? Answer:"
run_example(prompt)

# Question: Where is the fire next to? Answer: Near the snowman.
# [('the fire', (19, 27), [(0.171875, 0.015625, 0.484375, 0.890625)]), ('the snowman', (50, 61), [(0.390625, 0.046875, 0.984375, 0.828125)])]

# <grounding> Question: Where is<phrase> the fire</phrase><object><patch_index_0005><patch_index_0911></object> next to? Answer: Near<phrase> the snowman</phrase><object><patch_index_0044><patch_index_0863></object>.
定位图像描述
• 简要描述
prompt = "<grounding> An image of"
run_example(prompt)

# An image of a snowman warming himself by a campfire.
# [('a snowman', (12, 21), [(0.390625, 0.046875, 0.984375, 0.828125)]), ('a campfire', (41, 51), [(0.109375, 0.640625, 0.546875, 0.984375)])]

# <grounding> An image of<phrase> a snowman</phrase><object><patch_index_0044><patch_index_0863></object> warming himself by<phrase> a campfire</phrase><object><patch_index_0643><patch_index_1009></object>.
• 详细描述
prompt = "<grounding> Describe this image in detail:"
run_example(prompt)

# Describe this image in detail: The image features a snowman sitting by a campfire in the snow. He is wearing a hat, scarf, and gloves, with a pot nearby and a cup
# [('a campfire', (71, 81), [(0.171875, 0.015625, 0.484375, 0.984375)]), ('a hat', (109, 114), [(0.515625, 0.046875, 0.828125, 0.234375)]), ('scarf', (116, 121), [(0.515625, 0.234375, 0.890625, 0.578125)]), ('gloves', (127, 133), [(0.515625, 0.390625, 0.640625, 0.515625)]), ('a pot', (140, 145), [(0.078125, 0.609375, 0.265625, 0.859375)])]

# <grounding> Describe this image in detail: The image features a snowman sitting by<phrase> a campfire</phrase><object><patch_index_0005><patch_index_1007></object> in the snow. He is wearing<phrase> a hat</phrase><object><patch_index_0048><patch_index_0250></object>,<phrase> scarf</phrase><object><patch_index_0240><patch_index_0604></object>, and<phrase> gloves</phrase><object><patch_index_0400><patch_index_0532></object>, with<phrase> a pot</phrase><object><patch_index_0610><patch_index_0872></object> nearby and<phrase> a cup</phrase><object>
运行 Flask 服务器
flask_kosmos2.py 展示了该模型的 Flask 服务器实现,它允许将模型作为 REST API 进行访问。
启动服务器后,您可以向 http://localhost:8005/process_prompt 发送 POST 请求,并附带以下表单数据:
prompt:例如<grounding> an image ofimage:图像文件的二进制数据
这将产生一个包含以下 JSON 格式的回复:
message:Kosmos-2 生成的文本entities:提取的实体
通过像 Postman 这样的应用程序可以轻松测试此功能。确保将图像字段设置为 File。
from PIL import Image
from transformers import AutoProcessor, AutoModelForVision2Seq
from flask import Flask, request, jsonify
import json

app = Flask(__name__)

model = AutoModelForVision2Seq.from_pretrained("ydshieh/kosmos-2-patch14-224", trust_remote_code=True)
processor = AutoProcessor.from_pretrained("ydshieh/kosmos-2-patch14-224", trust_remote_code=True)


@app.route('/process_prompt', methods=['POST'])
def process_prompt():
    try:
        # 从 POST 请求中获取上传的图像数据
        uploaded_file = request.files['image']
        prompt = request.form.get('prompt')
        image = Image.open(uploaded_file.stream)

        print(image.size)

        inputs = processor(text=prompt, images=image, return_tensors="pt")

        generated_ids = model.generate(
            pixel_values=inputs["pixel_values"],
            input_ids=inputs["input_ids"][:, :-1],
            attention_mask=inputs["attention_mask"][:, :-1],
            img_features=None,
            img_attn_mask=inputs["img_attn_mask"][:, :-1],
            use_cache=True,
            max_new_tokens=64,
        )
        generated_text = processor.batch_decode(generated_ids, skip_special_tokens=True)[0]

        # 默认情况下,生成的文本会被清理,实体也会被提取。
        processed_text, entities = processor.post_process_generation(generated_text)
        parsed_entities = entities_to_json(entities)
        print(generated_text)
        print(processed_text)
        return jsonify({"message": processed_text, 'entities': parsed_entities})
    except Exception as e:
        return jsonify({"error": str(e)})


def entities_to_json(entities):
    result = []
    for e in entities:
        label = e[0]
        box_coords = e[1]
        box_size = e[2][0]
        entity_result = {
            "label": label,
            "boundingBoxPosition": {"x": box_coords[0], "y": box_coords[1]},
            "boundingBox": {"x_min": box_size[0], "y_min": box_size[1], "x_max": box_size[2], "y_max": box_size[3]}
        }
        print(entity_result)
        result.append(entity_result)

    return result


if __name__ == '__main__':
    app.run(host='localhost', port=8005)
Clip Vit Large Patch14
CLIP是由OpenAI开发的视觉-语言模型,通过对比学习将图像和文本映射到共享的嵌入空间,支持零样本图像分类
图像生成文本
C
openai
44.7M
1,710
Clip Vit Base Patch32
CLIP是由OpenAI开发的多模态模型,能够理解图像和文本之间的关系,支持零样本图像分类任务。
图像生成文本
C
openai
14.0M
666
Siglip So400m Patch14 384
Apache-2.0
SigLIP是基于WebLi数据集预训练的视觉语言模型,采用改进的sigmoid损失函数,优化了图像-文本匹配任务。
图像生成文本 Transformers
S
google
6.1M
526
Clip Vit Base Patch16
CLIP是由OpenAI开发的多模态模型,通过对比学习将图像和文本映射到共享的嵌入空间,实现零样本图像分类能力。
图像生成文本
C
openai
4.6M
119
Blip Image Captioning Base
Bsd-3-clause
BLIP是一个先进的视觉-语言预训练模型,擅长图像描述生成任务,支持条件式和非条件式文本生成。
图像生成文本 Transformers
B
Salesforce
2.8M
688
Blip Image Captioning Large
Bsd-3-clause
BLIP是一个统一的视觉-语言预训练框架,擅长图像描述生成任务,支持条件式和无条件式图像描述生成。
图像生成文本 Transformers
B
Salesforce
2.5M
1,312
Openvla 7b
MIT
OpenVLA 7B是一个基于Open X-Embodiment数据集训练的开源视觉-语言-动作模型,能够根据语言指令和摄像头图像生成机器人动作。
图像生成文本 Transformers English
O
openvla
1.7M
108
Llava V1.5 7b
LLaVA 是一款开源多模态聊天机器人,基于 LLaMA/Vicuna 微调,支持图文交互。
图像生成文本 Transformers
L
liuhaotian
1.4M
448
Vit Gpt2 Image Captioning
Apache-2.0
这是一个基于ViT和GPT2架构的图像描述生成模型,能够为输入图像生成自然语言描述。
图像生成文本 Transformers
V
nlpconnect
939.88k
887
Blip2 Opt 2.7b
MIT
BLIP-2是一个视觉语言模型,结合了图像编码器和大型语言模型,用于图像到文本的生成任务。
图像生成文本 Transformers English
B
Salesforce
867.78k
359
Featured Recommended AI Models
Llama 3 Typhoon V1.5x 8b Instruct
专为泰语设计的80亿参数指令模型,性能媲美GPT-3.5-turbo,优化了应用场景、检索增强生成、受限生成和推理任务
大型语言模型 Transformers Supports Multiple Languages
L
scb10x
3,269
16
Cadet Tiny
Openrail
Cadet-Tiny是一个基于SODA数据集训练的超小型对话模型,专为边缘设备推理设计,体积仅为Cosmo-3B模型的2%左右。
对话系统 Transformers English
C
ToddGoldfarb
2,691
6
Roberta Base Chinese Extractive Qa
基于RoBERTa架构的中文抽取式问答模型,适用于从给定文本中提取答案的任务。
问答系统 Chinese
R
uer
2,694
98